
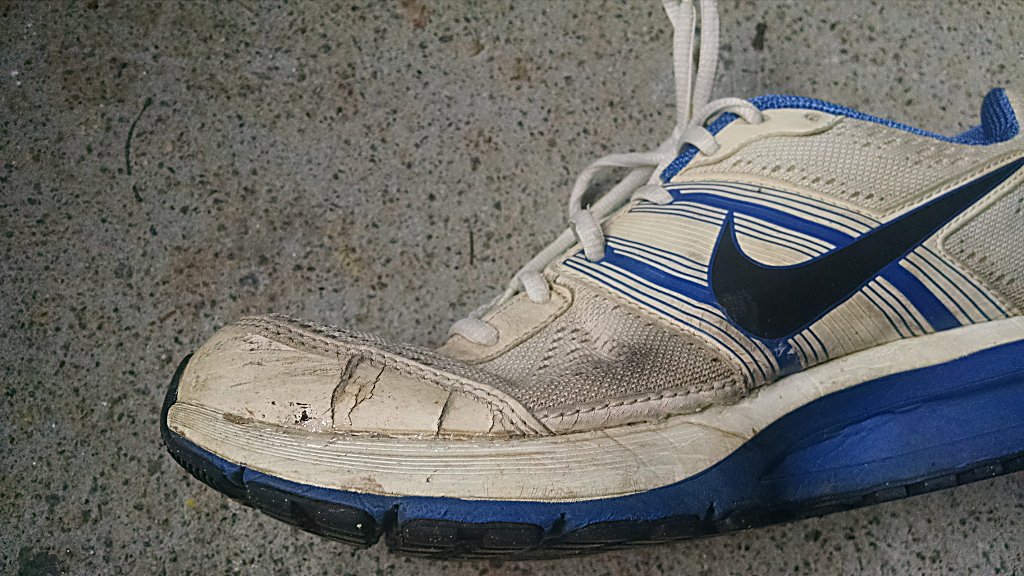
Shoes, like tires, slowly deteriorate over time even when they aren’t being used. Several things usually happen when shoes age – the foam cushioning hardens like a rock, the sole crumbles like cookies into pieces, or the glue breaks down and the shoe falls apart on your feet. From my experience with a couple pairs of Nike running shoes, it is the glue that gives out first if the shoes have been sitting unused in a shoebox for a while.
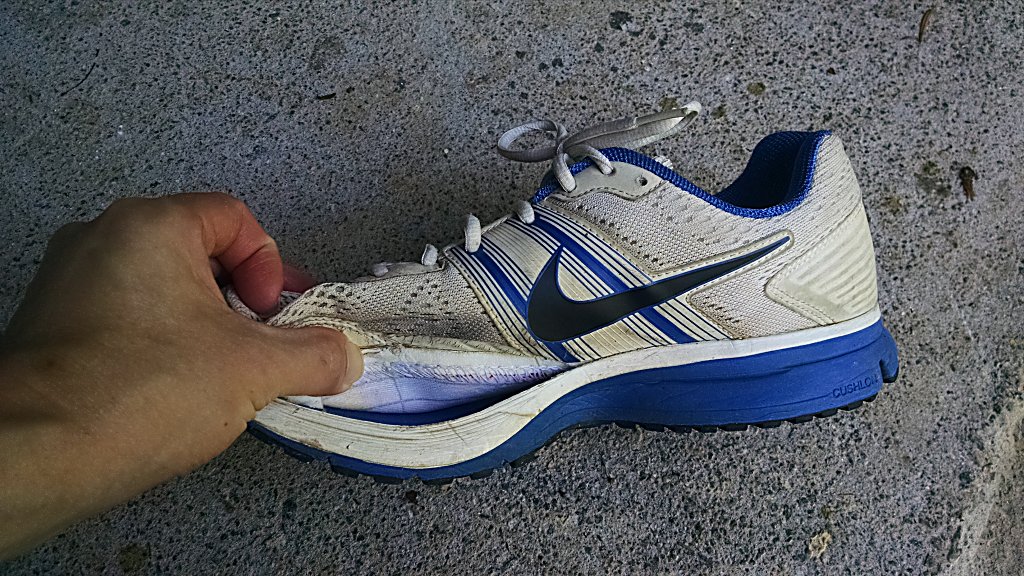
When a shoe starts falling apart, you might think that it’s time to buy a new pair. That is entirely not the case. There is no need to toss your perfectly good shoes into the trash if the midsole detaches from the upper, which was what happened to my running shoes.
You can fix your shoe quickly and permanently using a handy product called Shoe Goo.
Table of Contents
What Is Shoe Goo?
Shoe Goo was invented by Lyman Van Vliet in 1972. He was an avid tennis player who wasn’t in love (Hah!) with the durability of his tennis shoes. He created the adhesive that now came to be called Shoe Goo to patch up his shoes so he’d get more life out of them.
Shoe Goo comes out of the tube thick, sticks to whatever it is applied to, and bonds quick.
Besides gluing back together loose midsoles, Shoe Goo can be used to rebuild the sole on the bottom of your shoe, usually seen on the edge of the heel that has worn down. Shoe Goo can also be used as a waterproof sealer to repair holes in fabrics and footwear.
People have used Shoe Goo to repair many different kinds of shoes. Besides tennis shoes and running shoes, it can patch up dress shoes, hiking boots, high heels, work boots, basketball sneakers, and more. Skateboarders have used it for years to repair holes and damage on their skate shoes caused by the grip tape on their boards.
Shoe Goo may be marketed for shoe repair projects, but it will stick to almost anything. The package says it can be used on leather, vinyl, rubber, wood, glass, concrete, canvas, and metal.
Shoe Goo comes in two colors – transparent and black, and in three packaging sizes – a giant 3.7 oz tube, a 1 oz tube, and four mini .18 oz tubes.
Which size to choose? The giant tube and the mini tubes both cost the same price on Amazon. I went with the giant tube because I had 1.5 pairs of shoes I wanted to glue back together, with one shoe where the entire midsole had come loose. The 3.7 oz size was only a dollar more than the 1 oz and it’s always better to have more than not enough. For a small one-time project, then consider the mini tubes. Once opened, like rubber cement, the product will eventually dry out unless sealed very well.
Get the transparent color unless you are solely (Hah!!) patching shoe bottoms. Clear is clearly more versatile. Plus, it’s cheaper than black.
How To Repair Footwear With Shoe Goo
This is how I attached my midsole back to the upper portion of my shoe.
Step 1 – Gather Everything Needed
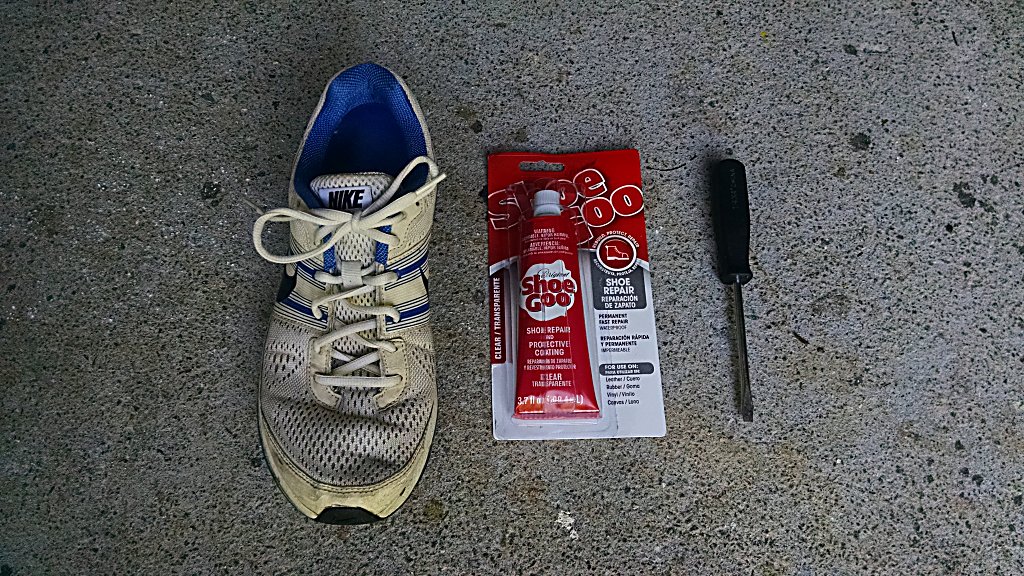
- A tube of Shoe Goo
- Busted shoe(s)
- An old toothbrush
- Wet paper towels for cleanup
- A tool to spread the adhesive. This could be a popsicle stick, the toothbrush’s handle, a plastic knife, or in my case, a screwdriver
- Something to secure the parts together while it dries. It can be a clamp, tape, rubber bands, or in my case, a dumbbell
Step 2 – Preparation
Use the toothbrush and some water to scrub off any dirt and dust where you will be applying the glue. Wait for it to dry. Remember, the key for most DIY repair projects is the prep. Skip this step and your glue won’t bond securely and you will have to do it again when it inevitably falls back apart.
Step 3 – Apply Glue
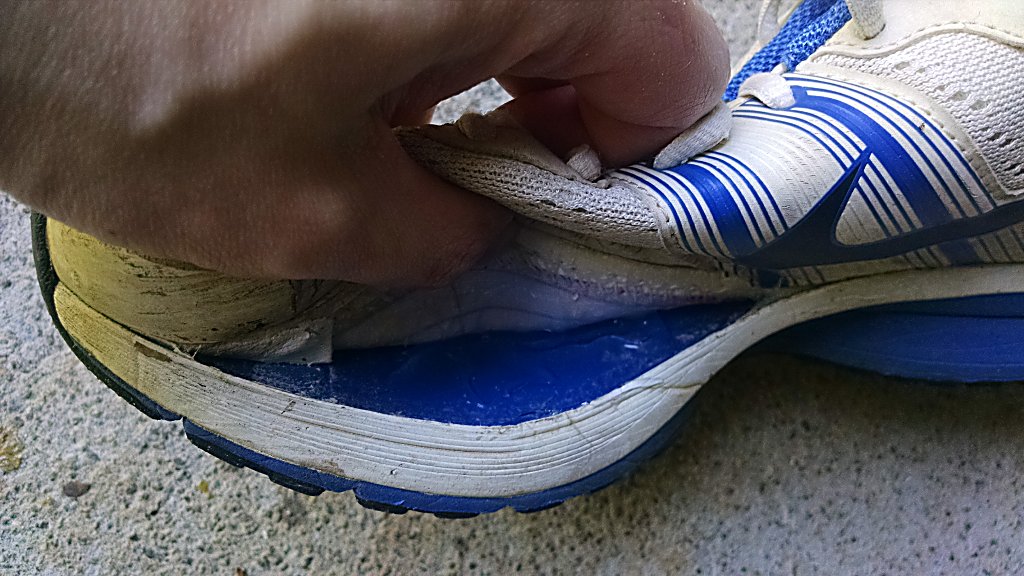
For the midsole, don’t bother using your spreader to apply the Shoe Goo if you have a large area to cover.
Stick the tip of the tube into the gap between the two pieces to squeeze out a generous portion. Now use the spreader to make sure there is a layer of glue covering the entire area you want to re-attach.
Even if some of the glue squeezes back out when you press the two pieces together, the extra glue will help with keeping water from getting in between the midsole and the upper. If there is way too much glue, you can use a wet paper towel to clean it up before it dries.
Step 4 – Clamp Together
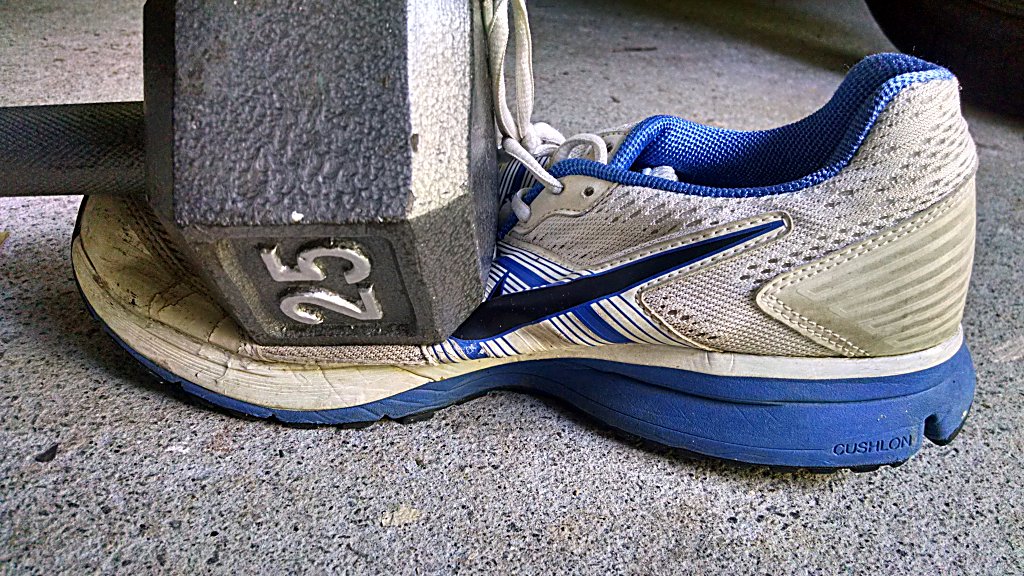
Shoe Goo starts to get tacky in about 2 minutes, so waiting a couple minutes can help with sticking broken pieces in their original position.
Once pressed together, use a clamp, tape, or other methods to keep pressure on the area while it dries. I used a dumbbell to put even weight onto the sole.
Step 5 – Wait
Once paired together, the glue needs at least 24 hours to cure and up to 48-72 hours for maximum strength. I left my shoe with the dumbbell pressing on it for a day and then sitting another two days for it to fully cure before wearing.
When dried, excess Shoe Goo feels like rubber cement and can be removed with some scratching, rubbing, and pulling. Can you see the extra glue in the above picture after the repair?
How To Rebuild Worn Soles
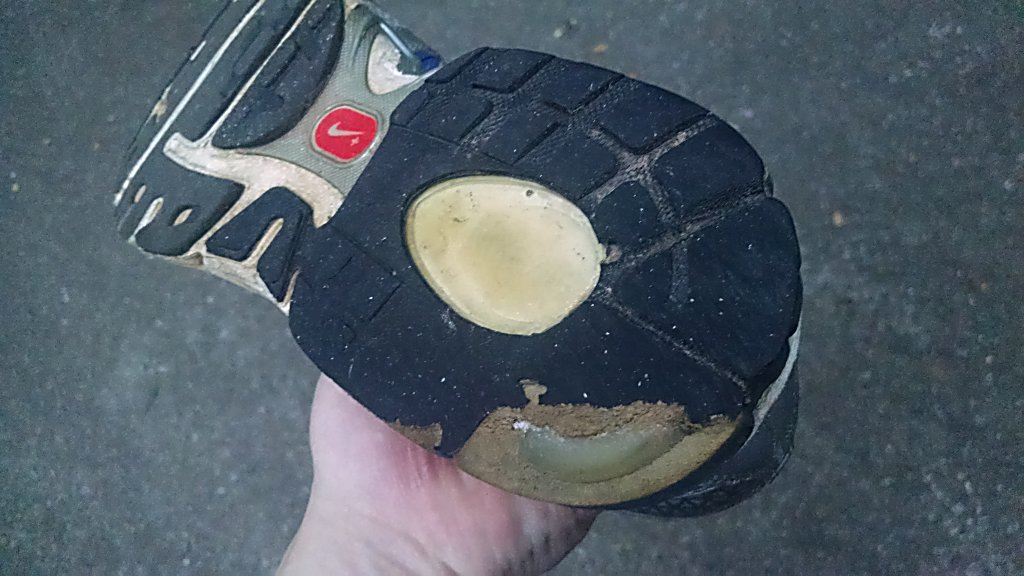
To fix a worn area on the bottom of your shoe, use your spreader tool, and spread a thin layer of Shoe Goo on your sole.
Allow this layer to dry 3-4 hours.
Repeat the process until you have a thick enough layer.
How To Repair Holes On The Side of Your Shoe
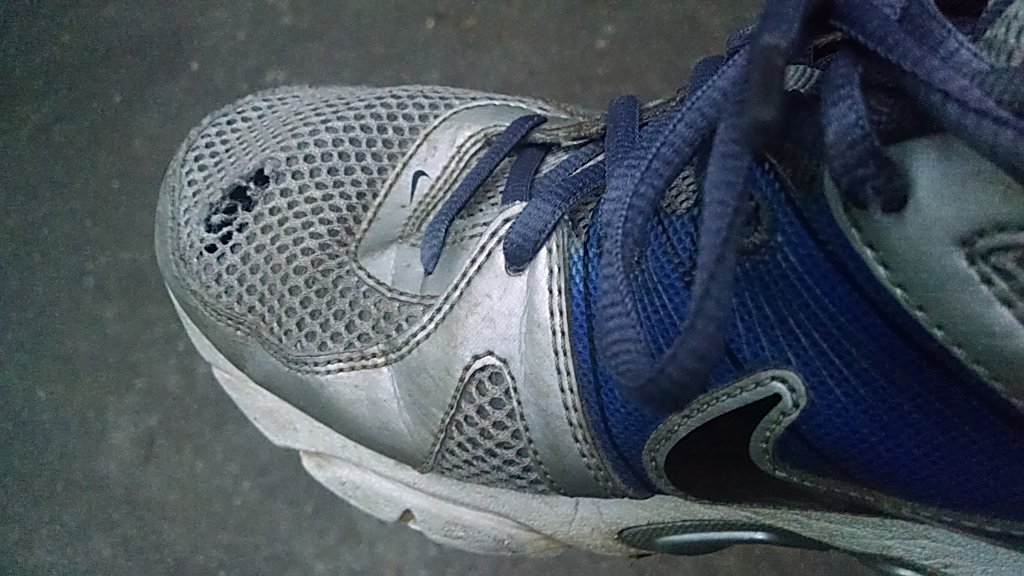
Since Shoe Goo can stick to canvas, plastics, vinyl, and leather, you can use it to fix tears and holes in your shoes too.
If there is a hole that has worn through and your big toe is now showing, you can use a piece of cloth with some glue on the inside of the shoe as a backer layer.
Then apply glue on the outside with the spreader to cover the hole and waterproof it.
Finally, glue a piece of material in the same color and type as your shoe on the final outside layer to make the repair less noticeable.
Is Shoe Goo Worth It?
I say yes. I believe in using the right product for the job and doing it right the first time. Gluing shoes is a pretty simple procedure. People have done it with other types of glue such as contact cement and epoxy.
The good thing about Shoe Goo is it is a permanent type of adhesive that is also flexible. This allows your shoes to flex and bend while you walk, run, and jump without breaking of the bonds.
It is also waterproof and can withstand temperatures from -40 to 180 degrees F.
The thick, gel-like consistency stays in place where you put it. It is better than the more liquid types of glues such as super glue because once squeezed together, Shoe Goo will spread out to all nooks and crannies, resulting in a stronger hold.
Last of all, you can’t really beat the price. I paid just under $5 for the 3.7 oz tube, which was more than enough to fix the loose soles on my three running shoes.
Closing $ense
Some people think spending a lot of money on a pair of shoes is a giant waste of money. However, as a runner, I see shoes as more of an investment. A good pair of shoes provides plenty of cushioning to prevent shin splints and knee problems from the constant pounding on the pavement. I’ve worn cheap running shoes before and they tend to be heavier and less breathable, with the latter resulting in excess sweating and increasing the chances of fungal infection aka athlete’s foot.
The downside with good running shoes is the cost. My preferred shoe is the Nike Pegasus, which is $120 retail and about $70 at the Nike Factory Store. If the bottom of the sole isn’t worn down, there aren’t any massive holes in the upper portion, the cushioning is still good, and the only problem being the glue no longer holding the shoe together, then repairing your shoes is worth the few bucks for shoe glue and the 10 minutes invested.
Yes, you can take your shoes to the cobbler to be mended. But doing it yourself will save you some money and it’s a simple project that anyone can do themselves at home.
Since fixing my pair of Nike’s, I’ve racked up close to 20 miles in them and the Shoe Goo repair has held up.
To keep more money in your wallet, make it a point to repair and not throw away things that still have a long life left in them.
Have you tried repairing any of your shoes? What did you use and how did it turn out?
It’s interesting to learn that shoe goo is known to be waterproof and withstand intense temperatures. My wife is wanting to make her shoes last a long time and she was wondering how she could make them waterproof. I’ll be sure to tell her that she should consider putting shoe goo on her favourite heels.
Hey Carl, Shoe Goo is great for a waterproof repair. To make shoes and fabrics really waterproof, what works really well is a water-repellent fabric spray like Scotchgard. Works great for everything from shoes, outdoor gear, umbrellas, tents, to ski pants.