When a new cell phone now costs hundreds to over a thousand dollars, a screen protector is a must-have accessory to protect your investment. A screen protector can protect your phone’s screen against scratches from keys and dirt in your pocket. In a worst-case scenario, a screen protector can take the hit from a drop and prevent your pricey phone’s display from shattering.
Not sure or confident on how to apply a screen protector on your phone? No matter whether you have an iPhone, a Samsung, or a Motorola, this step-by-step guide will help you apply a screen protector on any phone perfectly every single time. Guaranteed.
Table of Contents
How to Apply A Tempered Glass Screen Protector
In 2021, the only type of phone screen protector you should consider is a tempered glass screen protector. We’ve come a long way from plastic film protectors that end up hazy and scuffed up not long after installation.
Tempered glass protectors are clearer, have an oleophobic coating like on your phone’s screen to reduce fingerprints and for smoother swiping, and are much more durable.
No matter which brand you buy, the package will all come with one or more screen protectors, a wet wipe, a dry wipe, guide stickers, instructions, and either a dust sticker or a microfiber cloth.
The first thing you should do is read the instructions. Then throw them out and follow the below steps:
Step 1: Get the Tempered Glass Screen Protector
The screen protector will have two sides. The side that goes on your phone’s screen will have a plastic film with a tab for you to remove to expose the adhesive.
If you don’t know which side is which, run your finger from the top of the tab to the bottom. If you can feel the edge of the glass, you have it oriented correct side up.
Step 2: Place Screen Protector on Screen
With the plastic film still on the protector, align the screen protector perfectly onto your phone’s screen.
Newer phones will have a curved edge at the sides of the screen and the screen protector will likely not cover the screen entirely from one edge to the other. With the phone’s display lit, make sure the screen protector is centered on all sides over the display.
Check to see that any cutouts and holes for cameras, sensors, or microphones are correct.
Step 3: Tape Screen Protector to Phone
Remember those guide stickers? Most instructions will say to stick them on opposite corners of the screen protector to help align it as you eyeball and lower it onto the screen. Leave those stickers in the package or throw them away and grab some Scotch tape.
With the screen protector still perfectly placed on top of the screen, apply tape to the left-hand side of the phone, sticking the screen protector to the mobile phone. You can get by with a few pieces of tape, but the more you use, the more securely it will stay in place.
In the below photo, I applied tape all along the side of the phone and screen protector since the oleophobic coating made the tape’s hold less solid.
When you are done applying the tape, you should be able to flip the screen protector on and off the screen like opening a book.
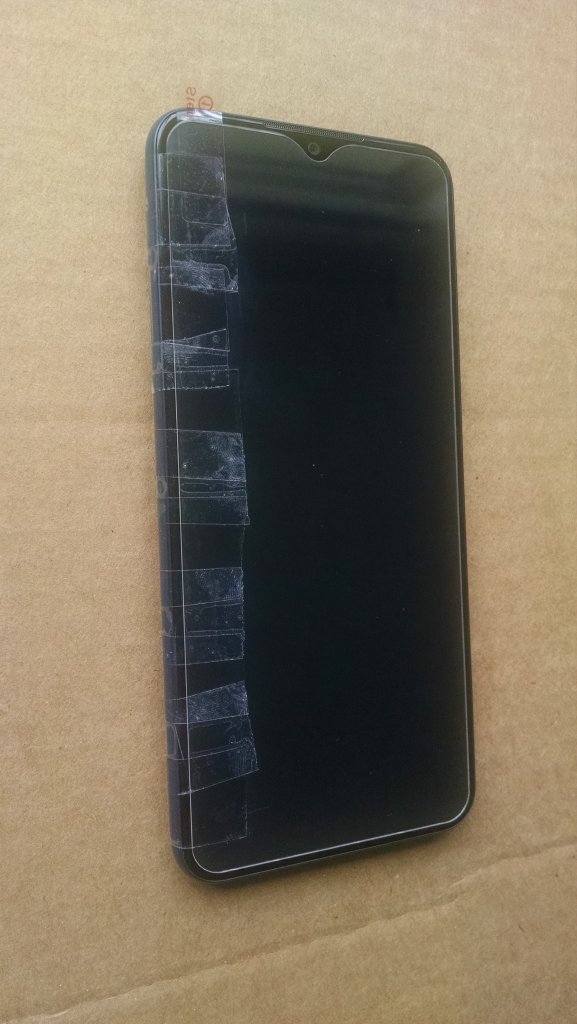
Photo Credit: Good Money Sense 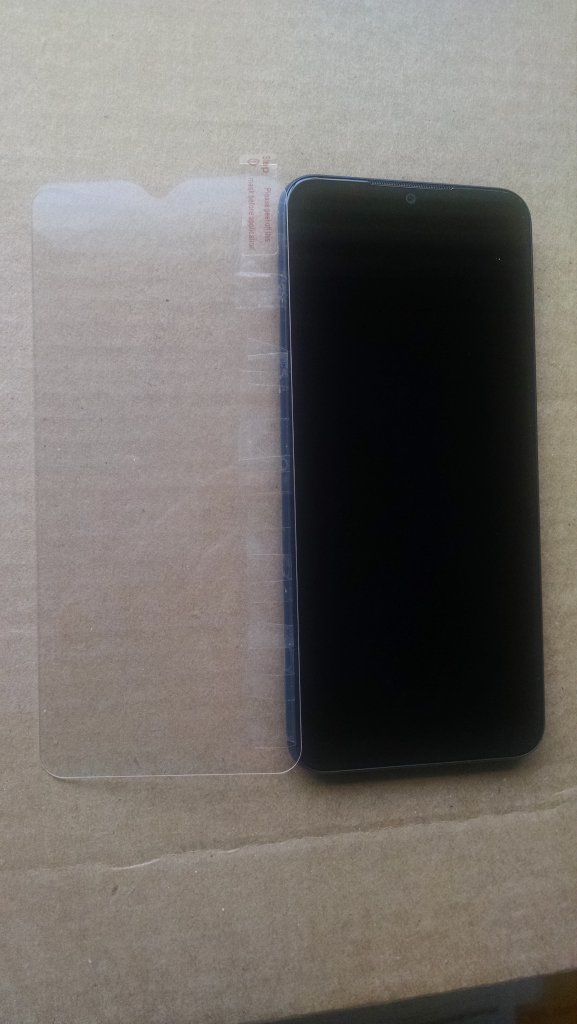
Photo Credit: Good Money Sense
Photo of a Moto G Play 2021 with the Ailun Tempered Glass Screen Protector from Amazon.
Step 4: Go Take a Shower
And bring the phone with you… into the bathroom, not the shower. Towards the end of the shower, turn off the bathroom fan.
Applying the screen protector in the bathroom after a shower does two things. The humidity from the hot water will reduce the amount of dust floating in the air. The soap will wash off most of the oils on your hands, reducing any fingerprints.
Step 5: Use Wet Wipe
The wet wipe is usually a small toilette with isopropyl alcohol. Wipe clean any dust, oils, smears, and fingerprints from the smartphone’s screen.
Step 6: Use Dry Wipe
Repeat the process with the dry wipe to wipe off any alcohol remaining the screen.
Step 7: Check Screen
Carefully examine the phone’s screen to make sure all fingerprints and dust have been removed from the display.
If you see fingerprints, repeat steps 5 and 6.
If you see dust particles, use the dust sticker, microfiber cloth, or dry wipe to remove them.
Step 8: Apply Screen Protector
Now remove the plastic film on the back of the tempered screen protector. Be sure to lift away from the phone so you don’t get any dust from the film on the freshly cleaned screen.
Next, flip the screen protector over onto the phone.
Once on the phone, you will press on the center of the screen protector and you should see it start to self-adhere onto the screen.
If you see any bubbles, gently press on the glass and push them out.
Closing $ense
Congratulations, you’ve now perfectly applied your tempered glass screen protector.
It is much easier and cheaper to replace a cracked or scratched screen protector than a damaged screen. For this reason, I apply a screen protector to all our phones and tablets within days of purchase.
When I was jogging recently, I had my phone slip out of my hand and land directly on the screen on the pavement. The tempered screen protector I had on there sacrificed itself and my screen was perfect underneath.
The secret to perfect placement is using tape on the edge of the screen protector to stick it securely to the phone. This is a much better technique than trying to freehand the placement while you guess where the screen protector should go.
Using tape lets you check and recheck to make sure your screen protector is placed correctly over the display. For the above phone, there was maybe 1mm of spacing on either side of the LED screen under the screen protector. I’ve had screen protectors with a small hole for a camera or microphone and a misalignment would mean having to remove the screen protector.
Do you have a screen protector on your phone? Has it protected your screen from damage? Do you have any suggestions or advice on how to put a screen protector on a phone?
Further reading: