In the blog post Switching To Colocation For Massive Savings, I posted about running out of space on a 72TB dedicated server that I was renting for $799 a month, the reasons on the decision to switch to colocating my own server, and some considerations to think about when going with colocation.
Table of Contents
The Old Dedicated Server
I was renting a server with the following specs since December 2012. Faced with either ordering a second server for the same price or building and colocating my own server, I did the math and decided to build my own.
| Processor | Intel Xeon E3-1230 Quad-core |
| RAM | 16 GB |
| OS Drive | Samsung Pro 840 120 GB |
| Hard Disks | 24 x 3TB Western Digital Red |
| Controller | LSI MegaRAID 9260-4i 512MB cache |
| Array | Hardware RAID6 |
| Storage | 72 TB Raw / 66 TB Usable |
| Bandwidth | 1 Gbps unmetered |
| Price | $799/month |
The New 144TB Storage Server
For the new storage server, rather than building one entirely from scratch, I turned to eBay for used enterprise hardware. Thanks to datacenters upgrading to newer, faster, and more power efficient servers, there are lots of slightly older hardware with lots of life left being sold by companies that go and buy off-lease servers to refurbish for resale.
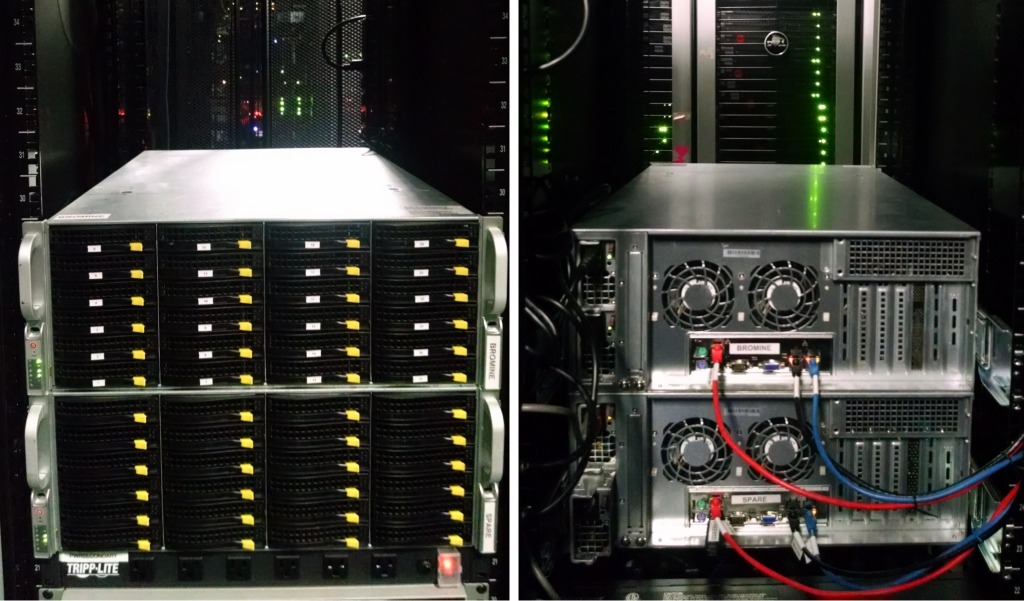
I ended up purchasing two identical barebones Supermicro 4u servers. The reason for buying two servers was to have a spare server in case of a hardware failure, in which case I can pull any part from the spare server to get the main server back up and running or even move all the drives to the spare if troubleshooting the main server takes longer than expected.
CPU
Dual Intel Quad Core L5630 Xeons are an extremely affordable CPU that support hyperthreading and ECC memory. Should I need more processing power in the future, I can upgrade to six core L5640’s.
Compared to the E3-1230 on the dedicated server, the E3-1230 might be more power efficient when idling, but two L5630’s should perform better when multitasking since it will have 8 physical cores and 8 hypertreading cores.
Memory
The server has 16 GB of ECC RAM using 4GB dimms. Used DDR3 server memory is relatively affordable these days, but I didn’t have any low memory issues with the old server with 16 GB, so I saw no reason to install more.
Motherboard
The server was built with the Supermicro X8DTE-F motherboard.
The nice thing about going with a server motherboard is it has IPMI support. IPMI is important because it will let me reboot, power up/down, check fans, voltages, and system temperature status, and console into the server as if I was right at the server in the datacenter even if the server was down. This is possible because IPMI has it’s own ethernet port and is always running when the motherboard is getting power unless disabled in the BIOS.
There have been some past security issues with IPMI and it is usually recommended to place the management port behind a firewall or VPN. After placing my server online, I noticed sometimes I wouldn’t be able to login because of IPMI not responding due to port scanners. My solution to this problem was to log into my switch and turn off that particular network port until I needed to use it
The Chassis
For the chassis, I went with a Supermicro 4u 846E16-R1200B. This chassis has six rows of four hot-swappable 3.5″ drive bays. The drives are kept cool by three 80mm intake fans in a fan wall behind the backplane. At the rear of the case, there are two 80mm fans that remove the heat from the case. All the fans are able to be hot-swapped, so there is no need to shutdown the server to replace a fan when one fails.
The chassis comes with dual 1200W redundant power supplies. This is more than enough power to spin up all 24 drives at once if the controller card did not support staggered spinup. With dual power supplies, we can connect each separate power supply to a A+B feed so if there is a power outage on one feed, the server can still remain online running off the second feed. If there is only one feed available, having redundant power supplies allows the server to stay up if one of the power supply dies.
Most importantly, the Supermicro 846E16-R1200B has a SAS2-846EL1 expander backplane. There are a lot more older Supermicro servers available that are selling for less money with the older SAS backplane, but the SAS2 backplane is needed because it lets me fill the entire server with drives that are larger than 2TB. An expander backplane also lets me use a single controller with one mini-SAS connector to connect all 24 drives. I might be paying more money for the backplane, but I will in turn save money only needing one disk controller with a single port. Of all the parts on the server, the SAS2 backplane is the hardest to find on the secondary market, which was why I purchased two servers to have an extra one on hand for parts.
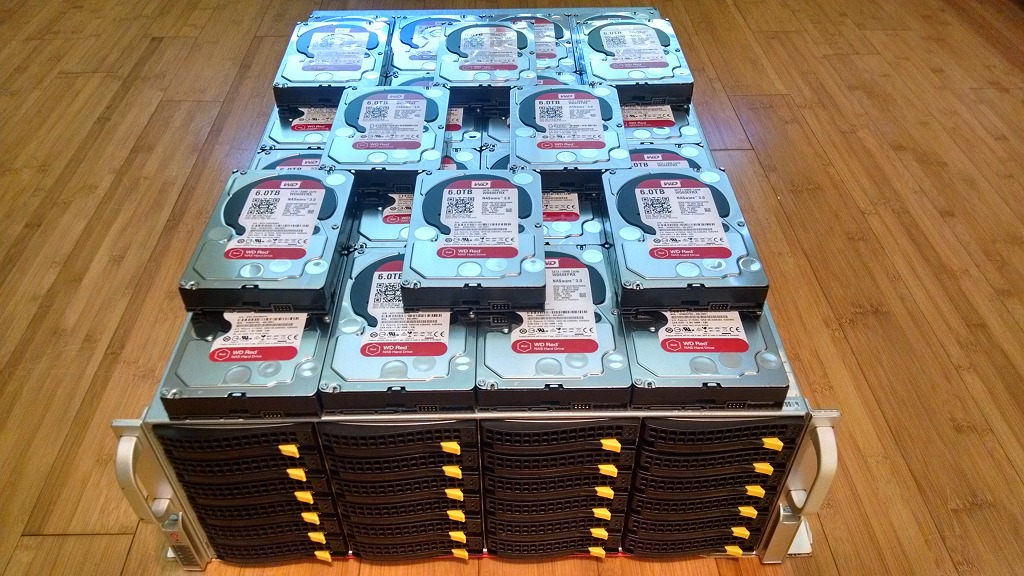
Hard Disks
I am using Western Digital Red 6TB NAS drives in the server. These particular drives only spin at 5400 RPM, which is ok since they will run cooler than 7200 RPM drives and with 24 drives, I have enough spindles to saturate a GigE port.
Using a drive designed for a NAS is important when using a hardware or software RAID because it has a feature that limits the amount of time spent recovering from a read or write error. Western Digital’s implementation is called TLER. For drives used in a desktop, you would want the drive to keep on trying to read a bad sector in hopes of being able to recover the data. However, in servers with multiple drives in an array, this data is available on another drive in the array and it is better that the controller or the software performed its own error recovery. If a drive took too long to read the data, it might lead to the drive being dropped from the array because the controller thought the disk has stopped responding.
The disks were one of the few things that were bought new for the server. This was more for the peace of mind since the hardware that has failed the most in my dedicated servers were the hard drives. The WD Red drives come with a 3 year warranty, and I purchased them with a credit card that will extend this by two more years.
Storage Controller
The server originally came with an Adaptec RAID controller, but this was swapped out for the MegaRAID 9260-4i made by LSI. Both Adaptec and LSI make good controllers, and the only reason for the switch was because the dedicated server I was renting used the same card and I had experience with it. What I liked about LSI is FreeBSD has a module that lets me see the S.M.A.R.T data from each individual drive.
Storage Array
The server will use hardware RAID6, which allows for two drives to fail without losing data.
ZFS was considered, since it also has RAIDZ2, which is similar to RAID6 and allows for two drive failures. Had I went with ZFS, I would have used RAIDZ3, which allows three simultaneous drive failures for extra peace of mind.
The reason why I did not go with ZFS was because I had limited amount of time to get all the files transferred off the old server and the new server up and running. This limited the testing I could have done because if there was a problem with the ZFS setup, I would have had to reformat and transfer all the data again. Transferring over 60TB of data off the old server at an average rate of 250 Mbps because of a peering issue took about a month. Each extra month that it took before I could cancel the server meant an extra $799 in costs and I also had to give 15 days advance notice for cancellation.
From my research, my biggest concern was that the random I/O performance of a ZFS VDEV is that of a single drive. If I had created a single RAIDZ3 VDEV with the 24 drives, I would have been limited to about 150 iops of one disk. For a single user, 150 iops might be enough, but since this was a server that streams data to hundreds of users a second, bursting up to 600 Mbps and over 700 iops at times, iops is important.
To get around the issue of only having the iops of one drive in a VDEV, people usually create multiple VDEVs for a zpool. In other words, maybe creating two RAIDZ2 VDEVs of 12 drives each with two drives in each VDEV for parity. However the problem with this is I’d have 4 drives or 24 TB less space. I could go with even less parity drives, like RAIDZ1, however if any VDEV in a zpool is lost, the entire array is lost.
Usually it’s not recommended to create one big array with 24 drives, but I was looking for the most storage space possible. The problem with large drives and many drives in an array is that rebuild times can take a very long time. With the old dedicated server, it took almost a week to rebuild a 3TB drive. Rebuilds would be a lot faster when a drive isn’t being accessed 24/7, which can’t be avoided in a server. One plus for ZFS is that it will resilver only the actual data on a drive so it is a lot faster to rebuild a drive unless the entire array is full, while a hardware RAID controller has no idea what data is on a drive and will always resilver the entire drive.
Other Hardware
Network Switch
For the switch, I am using a HP ProCurve 2848. This switch has 48 10/100/1000 ports, which is more than I currently need, but 48 ports would come in handy since each server can use up to three ports – one each for internet traffic, local traffic, and IPMI traffic.
The Procurve 2848 is a good basic managed switch that supports VLANs, has a browser-based management GUI over SSL in addition the ability to SSH into the switch to manage it using the command line.
A major bonus with HP enterprise networking gear is that it comes with a lifetime warranty with next business day advance replacement. Unlike some other manufacturers, HP’s warranty is not limited to the initial purchaser.
Since the switch is an older model, it does use a bit more power at 100W than newer switches. The fans on the 2848 are also a bit loud, but this was going into a datacenter so it wasn’t a problem.
Power Distribution Unit
For the PDU, I went with the APC AP7830. This is a metered Zero U with 24 available outlets. I liked this model because it has a LED readout showing the total power usage and it does not take up any rack space since it hangs on the wall on side of the rack.
A metered PDU is a good middle ground between a basic PDU that only has outlets and a switched PDU that allows you to see the power usage of each individual port and also power on/off each outlet over the network.
Colocation Costs
In the previous blog post I mentioned contacting the sales department with some questions. Simply because I reached out to them about my colocation needs, they offered the below option which was a better deal than what was listed on their website.
| Rack Space | 20U |
| Bandwidth | 500 Mbps |
| Power | 10A |
| Contract | 1 year |
| Setup | $0.00 |
| Price | $450/month |
Total Hardware Costs
Everything purchased for colocation cost me about $6,700.
| Item | Qty | Price | Total |
| Supermicro 4U 846E16-R1200B* 2x L5630 Quad Core Xeon 8 GB RAM 24x Drive Trays SAS2-846EL1 Backplane Rails Included |
2 | $551.00 | $1,102.00 |
| Micron 16GB PC3-10600R* | 1 | $10.98 | $10.98 |
| LSI 9260-4i* | 2 | $70.00 | $140.00 |
| HP ProCurve 2848* | 2 | $57.50 | $115.00 |
| APC AP7830 PDU* | 2 | $57.00 | $114.00 |
| Samsung Evo 850 250GB SSD | 1 | $88.48 | $88.48 |
| Western Digital Red 6TB | 24 | $211.99 | $5,087.76 |
| Cat5e Patch Cable (Red) | 2 | $1.14 | $2.28 |
| Cat5e Patch Cable (Blue) | 2 | $1.14 | $2.28 |
| Cat5e Patch Cable (Black) | 2 | $1.14 | $2.28 |
| 40mm Fan For LSI 9260-4i | 2 | $0.33 | $0.66 |
| M3 Machine Screws | 1 | $0.70 | $0.70 |
| * Used | Total: | $6,666.42 | |
Colocation vs Dedicated Hosting Savings
Looking at the below chart comparing colocation to dedicated hosting, colocation has a high initial up-front startup cost to purchase all the hardware.
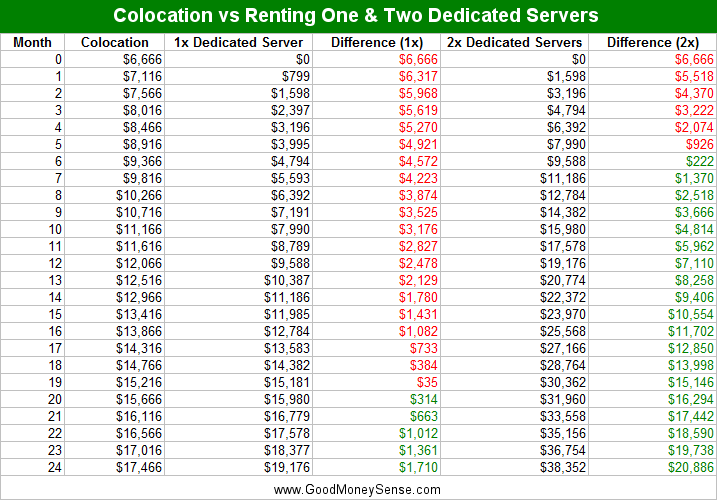
Since the monthly fee to colocate a server was only $450 a month, I am saving $349 a month compared to renting one dedicated server. After 19 months, I start coming out ahead. While 19 months might seem like a long time to recoup my costs, I’ve been renting that dedicated server for 4 years already. If I had gone with colocation initially, I would have saved over ten thousand dollars over the years.
Now consider if I had rented a second identical 72TB dedicated server instead of looking into colocation. The length of time before I start saving money on my hosting costs is even faster. By the 6th month, I would have been in the green. By the two year mark, I would have saved almost $21,000!
In Summary
When starting out in business online, choosing to go with virtual, cloud, and dedicated hosting makes sense. These options allow a small business to invest little in up-front capital on infrastructure and be able to scale up on-demand.
In the early stages of business, the important thing is to get the product in front of the customer. Letting another company whose sole purpose is hosting sites and running servers worry about the hosting aspect allows an online business to focus on its core product.
As a business matures and at a certain size, it may begin to make sense to evaluate other hosting options such as colocation. By paying for exactly what infrastructure is needed, a business can save thousands or even hundreds of thousands of dollars a year.
In my case, I have a half rack with 20U of space in which I’ve only used half of that space and 4A of power. I can easily add another 4U storage server or even 2U servers with four compute nodes in the future at only the cost of purchasing the hardware.
Do you have a website? Have you switched from one type of hosting to another and found you saved a lot of money in the process?