
As a website or blog owner, increasing your website speed has an enormous impact on your site’s success. As internet speeds get faster, people are less willing to wait around for a slow site to load. Page speed is so important, Google has made it a ranking factor in their search algorithm.
With millions of other sites to choose from on the search results, it’s very easy for a visitor to hit the back button and click on a competitor’s site next on the list.
Numerous studies have been done on the impact of how website speed affects sales, user experience, conversions, and ad revenue.
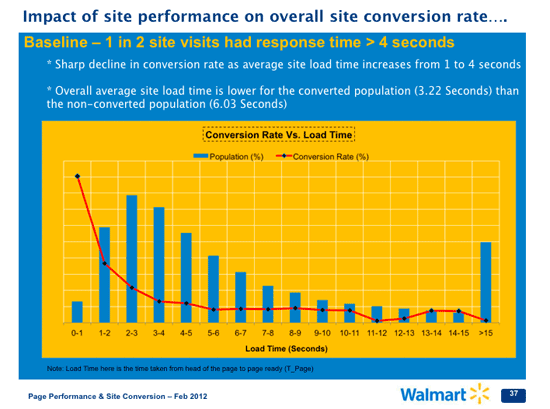
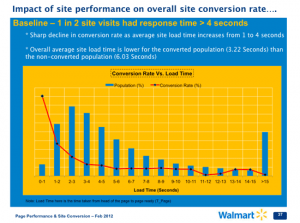 Walmart found that there was a sharp decline in conversion rates as the average site response time increases from one second to four seconds.
- Akamai found that 47% of people expect a web page to load in two seconds or less and 40% of people will abandon a website if it takes more than three seconds to load.
- Amazon calculated that a page loading one second slower could lead to $1.6 billion in less sales a year.
- Google found that slowing their search results by only four-tenths of a second could cost them 8 million searches a day, meaning millions of less ads being shown.
In this guide that will be regularly updated whenever I discover something new to add, I’m going to gather everything on what you can do to increase website speed and performance.
First of all, you need to get an idea of your website’s current speed. Online tools that you can use are:
With your website’s speed test results in hand, how do you know whether your load time is fast enough? In a Google Site Performance For Webmasters YouTube video, the presenter states that “Akamai found that two seconds is the threshold for e-commerce website acceptability. At Google, we aim for under half a second”.
In other words, the faster the better but a good goal to shoot for is two seconds. How fast does your site load?
Table of Contents
General Performance Tips
Use a Content Delivery Network (CDN)
Hosting your static media files such as pictures, css, and javascript on a content delivery network is one of the easiest ways to get a big increase in website speed for your visitors.
A CDN works by hosting your files on a network of servers all over the world. When a visitor accesses your site, the files will be downloaded from the server closest to them. Without a CDN, a visitor from Australia will need to wait while your files are sent thousands of miles across the Pacific Ocean.
Available CDN providers include MaxCDN, KeyCDN, Rackspace CDN, Amazon Cloudfront, and the ever-popular Cloudflare. Several of the aforementioned CDNs charge as low as a few cents to a dime per gigabyte of data transferred, making it extremely affordable for anyone to get started on a budget.
Merge and minify static files
Reduce the number of HTTP requests that need to be completed by the browser and webserver to render a page. For most popular browsers, the default number of concurrent connections is 6 or 8 per server. By combining several css files or javascript files into one or two big files, the browser can start to render a page after one request instead of several.
Minification is the practice of removing unnecessary characters such as extra spaces, empty lines, tabs, and comments from code to reduce the size of a file and speed up download times. Those extra characters make the files easier for humans to read but are not needed by computers.
Avoid inline javascript and css code
If you use the same css or javascript code on many pages of your site and they are inlined in the page itself, consider moving that code into an external css or javascript file.
I know for WordPress, there is an option to modify the template’s css without actually editing the file itself by adding additional css to a theme. This additional css is added to the site on all the pages, increasing the size of the pages that need to be downloaded.
By moving commonly used javascript and css into an external file, you can leverage browser caching of the files and reduce the size of your content pages.
Specify image dimensions
Adding the height and width to the image tag will help your page display faster. You may have visited some sites where the text on the page will load first, then suddenly an image will display in the middle of a block of text after it finishes transferring. This then causes the text on the page to rearrange itself around the image.
By specifying the image dimensions, the browser will lay out the page as it should appear the first time with placeholders for the images to appear when they finish downloading.
Do this: <img src=”/images/example.png” height=”120″ width=”400″>
And not this: <img src=”/images/example.png”>
Reduce redirects
Each redirect requires an additional HTTP request and response, which slows down the loading of your site. To increase website speed, limit the number of redirects to reach the correct page.
Sometimes a redirect cannot be avoided, such as a redirect from http:// to https://
But if you are linking to a page such as http://www.example.com/blog, and your blog is served from a directory, you are forcing an additional redirect because the visitor would be automatically redirected to http://www.example.com/blog/ with the ending slash by the webserver software.
This also gets worst if you are redirecting to another hostname. Let’s say you are automatically redirecting everyone who types www.example.com to example.com. The visitor’s browser will need to perform an additional DNS lookup before it can perform the redirection.
Now let’s say you have a subdomain m.example.com for mobile users. Mobile visitors will have a slow user experience if they are redirected from www.example.com > example.com > m.example.com. To speed up the process, consider rewriting your scripting to go from www.example.com > m.example.com instead.
Increase the speed of your domain’s DNS lookups
The Domain Name System (DNS) works by mapping an easy-to-remember domain or hostname to the numeric IP address of the server. Each time you enter a domain in your browser, it takes a DNS resolver 20-120 milliseconds on average to return an IP address.
To speed up browsing, DNS queries are usually cached after the initial request. On your web page, each unique domain and subdomain for things such as an advertising network, content delivery network, social media share buttons and plugins, or website analytics services all require a separate DNS lookup.
Each DNS lookup results in additional load time because a page can’t fully render until all the lookups are completed.
While you can’t do much about the speed of the DNS lookups for other services such as your ad network other than reducing the number of requests that query unique hostnames on your site, you can speed up your own domain’s DNS lookups by switching to a faster provider.
The below speed comparison from SolveDNS shows the speed of some popular free and premium DNS providers.
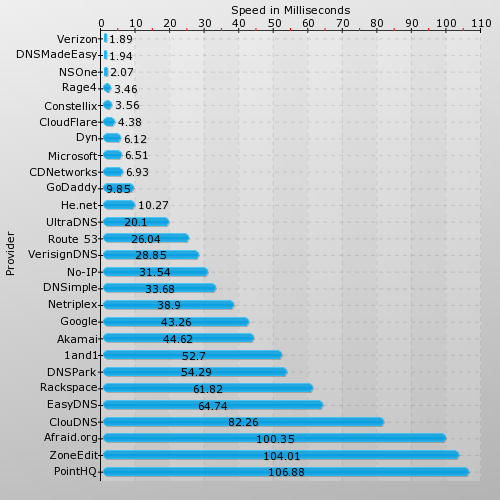
If you are on a budget, Cloudflare DNS is free for the first 500,000 queries. Godaddy’s DNS is also available if your domain is registered through them.
Dedicated Server or VPS Performance Tips
Upgrade your PHP
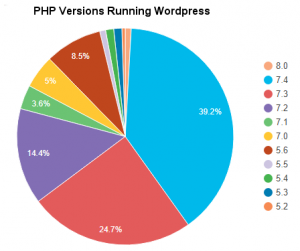
According to WordPress’ statistics, over 13% of WordPress blogs are still running on PHP versions 5.6 or older.
With PHP 5.6 support reaching the end of life on December 31, 2018, now is a good time to consider upgrading to version 7.4 or later if you are on a dedicated server or a virtual private server (VPS).
On some VPS and virtual hosts, older PHP versions are provided for compatibility purposes. Switching to a newer version is as easy as selecting which version you want to use in their control panel.
Not only will upgrading to the latest version of PHP keep your site secure, benchmarks show that PHP 7.4 is 60% faster than PHP 5.6 and PHP 8.0 is even faster.
Benchmark Results by Kinsta
- WordPress 5.6 PHP 5.6 benchmark results: 123.52 req/sec
- WordPress 5.6 PHP 7.0 benchmark results: 155.08 req/sec
- WordPress 5.6 PHP 7.1 benchmark results: 145.31 req/sec
- WordPress 5.6 PHP 7.2 benchmark results: 187.03 req/sec
- WordPress 5.6 PHP 7.3 benchmark results: 189.14 req/sec
- WordPress 5.6 PHP 7.4 benchmark results: 197.01 req/sec
- WordPress 5.6 PHP 8.0 benchmark results: 233.40 req/sec
Use Expires headers for browser caching
Rather than have the web browser re-download your entire blog or website each time a user visits, you can have your webserver tell the browser to cache rarely changed files locally on the user’s hard drive by using the Expires header.
By setting the expiry date for files such as images, css files, javascript, and flash, your site will load faster on subsequent visits because less data needs to be transferred over the internet connection. You also reduce the number of HTTP requests that need to be made.
Setting the expiry headers will have the biggest impact on sites with users who visit often. In the initial visit, the user will need to download all the files. But on future visits, they won’t need to download a single byte of the cached components.
The below instructions show how to set the expires header for both Apache and Nginx.
To enable expires header in Apache, add this to your .htaccess or your Apache configuration file
<IfModule mod_expires.c>
ExpiresActive On
ExpiresByType image/gif "access plus 60 days"
ExpiresByType image/jpeg "access plus 60 days"
ExpiresByType image/png "access plus 60 days"
ExpiresByType application/x-javascript "access plus 60 days"
ExpiresByType text/css "access plus 60 days"
ExpiresByType image/x-icon "access plus 60 days"
</IfModule>
Place the below location block in your Nginx configuration file in the domain’s server block to set Expires headers
location ~* \.(js|css|png|jpg|jpeg|gif|ico)$ {
   expires 60d;
}
Switch to HTTP2
HTTP/2 is much faster and more efficient than HTTP/1.1 through the use of multiplexing and more advanced header compression.
HTTP/1.1 sends one part of a page at a time. Large requests like images or big javascript files may block the rest of the page from loading. HTTP/2 solves this problem by sending several streams of data to the visitor’s browser at once.
From my own PageSpeed Insights testing, simply switching to HTTP/2 boosted my mobile scores by almost 10 points.
Use Gzip to compress your pages
Reduce the size of the files being transferred over the internet with Gzip. Files such as text, html, stylesheets, javascript, xml are all highly compressible. You can compress those files types and lower the amount of data transferred by about 70%. This saves bandwidth and decreases the time users are waiting for your pages to download.
In Apache 2.x, gzip is enabled with the mod_deflate module while Nginx uses the ngx_http_gzip_module.
To enable Gzip in Apache, use the following in your .htaccess or server configuration:
<IfModule mod_deflate.c>
AddOutputFilterByType DEFLATE text/plain
AddOutputFilterByType DEFLATE text/html
AddOutputFilterByType DEFLATE text/xml
AddOutputFilterByType DEFLATE text/css
AddOutputFilterByType DEFLATE application/xml
AddOutputFilterByType DEFLATE application/xhtml+xml
AddOutputFilterByType DEFLATE application/rss+xml
AddOutputFilterByType DEFLATE application/javascript
AddOutputFilterByType DEFLATE application/x-javascript
</IfModule>
For Nginx, you can use the following in your configuration file:
gzip on;
gzip_disable "msie6";
gzip_min_length 1100;
gzip_buffers 4 8k;
gzip_http_version 1.1;
gzip_comp_level 5;
gzip_proxied any;
gzip_types text/plain text/css text/javascript text/xml application/javascript application/x-javascript application/xml application/xml+rss;
Switch to Apache event MPM
The default mode for Apache is prefork multi-processing module (MPM) where each child process handles one connection at a time. Since each child process needs to load a PHP interpreter, it uses more memory than the other MPMs.
The event MPM allows more requests to be served simultaneously by passing off some of the processing work to the other threads and freeing up the main threads for new requests.
To find out which module you are currently using, at the command prompt run httpd –V and look for the server MPM type.
$ httpd -V
Server version: Apache/2.4.33 (FreeBSD)
Server built: unknown
Server's Module Magic Number: 20120211:76
Server loaded: APR 1.6.3, APR-UTIL 1.6.1
Compiled using: APR 1.6.3, APR-UTIL 1.6.1
Architecture: 64-bit
Server MPM: prefork
threaded: no
forked: yes (variable process count)
Benchmarks have found that on a WordPress page, the event MPM was able to serve 1.75x more requests than the prefork MPM and used almost half as much memory.
Use Nginx instead of Apache for even more speed
In the above tip, you can get much more performance out of your existing server by switching to the event MPM with Apache. In doing so, you must also use php-fpm for PHP. Unless Apache is required for your site and because you’d need to switch to php-fpm anyways, you can switch your webserver software to Nginx instead for increased website speed.
Nginx was originally written with the goal of outperforming Apache and tackling the C10k problem of serving 10,000 clients at once. Today Nginx is the second most widely used webserver software. 55% of the top 10,000 sites on the internet use Nginx for their web serving.
One benchmark shows that when serving static content, Nginx was almost twice as fast as Apache. If you are not using a CDN for your static files, you could see an improvement in your site’s speed by switching to Nginx.
Some people prefer to use Apache because it has features they need or they prefer mod_php. For this, a reverse proxy can be set up to serve static files with Nginx and have Apache handle the dynamic content. Another possibility is using Nginx on a subdomain only for static files and having Apache listen on another IP address.
For WordPress, you can use a caching plugin to turn a dynamic PHP blog into static files and use Nginx to take advantage of its speed in serving this type of content.
Use a tmpfs for your MySQL temporary directory
These days many sites use a database to organize their data. The most popular database currently is MySQL, but this tip should work for any database software.
For some database queries, MySQL needs to create temporary tables. MySQL will either create these tables in memory or on the disk depending on how much memory is allocated by the tmp_table_size variable or the type of data being stored. In cases such as large table joins, table sorts, and with BLOB/TEXT columns, which are not supported by the MEMORY storage engine, it must create these tables on disk.
We all know that accessing data on a mechanical disk is the slowest part of the computer. By moving the temporary table directory to a RAM drive or tmpfs, you can reduce the number of slow queries reported by MySQL, lower the number of resources used, decrease the load on the server, and even increase the life of your drive if you are using a SSD.
That last part about the SSD? I’ve worn out a datacenter-class SSD in just over a year on a busy site after MySQL wrote over 300TB of data to it. Luckily it was a rented dedicated server and I didn’t have to pay a few hundred dollars for a replacement.
Disable .htaccess when possible
For virtual hosting where multiple customers are on a server, .htaccess is usually enabled so individual webmasters can configure their hosting environment to suit their needs. Perhaps they want to password-protect or enable hotlink protection for a certain directory. This can be easily done by adding a .htaccess file without contacting the hosting service.
On a dedicated server or a VPS where you have full control of your Apache configuration, the Apache docs recommend .htaccess be avoided when possible. The main reason for this is there is a performance hit when .htaccess is enabled even when it’s not being used.
When .htaccess is enabled, every time a file needs to be accessed in a directory by Apache, multiple extra hard drive read requests are needed as additional file-system accesses are performed to look for a .htaccess in that directory plus every directory above it.
The solution to this is to set AllowOverride to “None” and place your configuration changes that would have gone in the .htaccess in the Apache configuration files. For most people, this would be in the individual VirtualHost section for each virtual domain in the httpd-vhosts.conf.
Speed up your hard drive by disabling atime
For many Unix-style systems such as Linux and FreeBSD, the operating system keeps three timestamps per file: create time (ctime), last-modified time (mtime), and last-accessed time (atime).
For a web server, you would rarely need the timestamp of the last-accessed time. For a very popular website, the files would be constantly accessed and therefore updated every second. Each read will cause a write on the drive. By disabling the logging of the access time, you speed up your site by using the extra iops of the drive for more important things like serving files or database queries.
WordPress Performance Tips
Use a caching plugin
Every time a visitor accesses your WordPress blog, WordPress needs to perform multiple database queries to get your blog post, images, user comments, and page layout. Then PHP is needed to generate the post. Now think of how often those components from your post need to be updated. Not that often usually after your post has been published. For many, your page might only need to be changed when you get a new comment.
To increase your website’s speed, you can use a caching plugin to produce a static version of your site. Popular WordPress caching plugins include W3 Total Cache, WP Super Cache, WP Rocket, Hyper Cache, WP Fastest Cache, and more.
Disable unused plugins
Take a look at the number of active plugins on your blog that you’ve tried once and never touched again. Those extra plugins tend to load additional css and javascript files, and may even utilize additional database queries.
Plugins that are not being used should be disabled or better yet deleted. A disabled plugin will still be in your plugin directory on your host, which could become a security issue if it is not actively updated.
Closing $ense
As internet speeds get faster, people expect the sites they visit to load just as fast. If your site is not keeping up, you will be passed over for your speedier competitors.
In the earlier days of the internet, there was a popular search engine called Altavista. Then a new upstart arrived on the scene with a funny name that returned hundreds of thousands of relevant results in almost an instant. Google grew to dominate online search while Altavista is no more.
How fast does your site load? Any tips on increasing your website’s speed and performance?