In a blog post from last year, I wrote about why as a blogger or website owner you should use SSL for your sites, how to get free SSL certificates from LetsEncrypt and set them up to work with Apache webserver.
On March 13, 2018 LetsEncrypt announced support of wildcard certificates with the release of their new ACMEv2 protocol. So it’s time for a new tutorial on how to create a wildcard certificate. This time we will be setting them up to work with the webserver Nginx.
If you are interested in getting a LetsEncrypt wildcard certificate, there is a major caveat during the renewal process. Before going through the installation steps, you may want to skip ahead to the renewal section and read that first.
Table of Contents
What Is A Wildcard Certificate and Why Would You Use One
Wildcard SSL certificates allow you to secure an unlimited number of your site’s subdomains with a single certificate. Back when SSL certificates were only available to be purchased from a certificate authority, we had to option to purchase a single certificate for a domain name that included example.com and www.example.com. If we wanted to secure blog.example.com, we would have to purchase another certificate.
As you can imagine, if we had many subdomains that needed certificates, this could get expensive. By purchasing a single wildcard certificate, we can secure all our subdomains with less administrative work. Naturally, the certificate authorities charged more for one.
With a wildcard certificate for *.example.com, you can secure:
- example.com
- www.example.com
- blog.example.com
- mail.example.com
- forum.example.com
If you request a certificate for *.www.example.com, you can then secure:
- www.example.com
- mail.www.example.com
- blog.www.example.com
- forum.www.example.com
- pictures.www.example.com
For most people, they may never need a wildcard certificate because there is a limited number of subdomains that they will be using. Since LetsEncrypt certificates are free, it is usually not a problem to request another certificate for each new subdomain being created.
Somewhere where wildcard certificates would come into play is for sites that are offering services for users. For example, a company wants to offer free blog or forum hosting to other people, and each new blog or forum is hosted on a subdomain that is created on demand. Rather than deal with the logistics of requesting and renewing certificates for thousands of subdomains, they can just request a single wildcard certificate to secure them all.
How To Create A Wildcard Certificate With LetsEncrypt
This step-by-step guide will show you how to create a free LetsEncrypt wildcard certificate and configure it for the Nginx webserver on FreeBSD 10. If you are running Apache, you can see the tutorial on how to set up SSL in Apache from our previous blog post.
Step 1: Install Certbot
You will need to use Certbot version 0.22 or newer to create wildcard certificates. If you have Certbot already installed on your server, you can find out the version with the command
$ certbot --version
If you haven’t installed Certbot yet, you can find the instructions for your OS by going to the EFF’s Certbot page.
To install Certbot on FreeBSD:
$ cd /usr/ports/security/py-certbot && make install clean
Step 2: Generate A Wildcard Certificate
What is different with requesting a wildcard certificate is that wildcard domains need to be validated with a DNS challenge type. This is different from the process of requesting a domain certificate in our previous tutorial, which used webroot for the challenge.
Doing a DNS challenge requires modifying the DNS TXT records to show that you are in control of the domain name.
As of May 24, 2020, Certbot has the following plugins available that automate the process for the following DNS providers:
- Cloudflare
- CloudXNS
- DigitalOcean
- DNSimple
- DNS Made Easy
- Google Cloud DNS
- Linode
- LuaDNS
- NS1
- OVH
- RFC 2136 Dynamic Updates
- Amazon Web Services Route 53
If your domain uses one of the above providers for its DNS, you can request a wildcard certificate by using the following command, replacing –dns-cloudflare with the plugin for your provider and then skip to Step 4
$ certbot certonly --email email@yourdomain.com --dns-cloudflare --agree-tos -d 'yourdomain.com,*.yourdomain.com'
Otherwise, you will need to use the manual method to obtain a certificate
$ certbot certonly --manual --email email@yourdomain.com --preferred-challenges dns --server https://acme-v02.api.letsencrypt.org/directory --agree-tos -d 'yourdomain.com,*.youdomain.com'
To generate multiple certificates, append additional subdomains separated by a comma for the –d value. I also had to place the domain with the asterisk in quotes or I would get an error saying “no match”
Step 3: Add TXT Record To Your Domain’s DNS Records
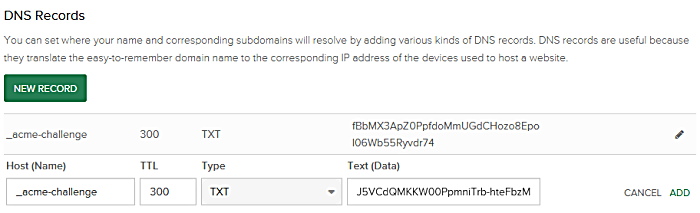
Certbot will next ask you to modify your DNS record. For each wildcard certificate you are creating, you will need to add a separate record. For example, if you used the –d ‘yourdomain.com, *.yourdomain.com’, you will be prompted to add two TXT records.
Please deploy a DNS TXT record under the name
_acme-challenge.yourdomain.com with the following value:

fBbMX3ApZ0PpfdoMmUGdCHozo8Epol06Wb55Ryvdr74

Before continuing, verify the record is deployed.
-------------------------------------------------------------------------------
Press Enter to Continue

-------------------------------------------------------------------------------
Please deploy a DNS TXT record under the name
_acme-challenge.yourdomain.com with the following value:

HHT9yOT41wIKG8BJ5VCdQMKKW00PpmniTrb-hteFbzM

Before continuing, verify the record is deployed.
-------------------------------------------------------------------------------
Press Enter to Continue
In the above example, you will create new TXT records with:
Name 1: _acme-challenge
Value 1: fBbMX3ApZ0PpfdoMmUGdCHozo8Epol06Wb55Ryvdr74
Name 2: _acme-challenge
Value 2: HHT9yOT41wIKG8BJ5VCdQMKKW00PpmniTrb-hteFbzM
Once you’ve created and saved your record, you will need to wait for your domain’s DNS to update. You can verify that your TXT record has propagated by using the Gsuite Dig Tool and entering _acme-challenge.yourdomain.com and selecting TXT.
Once your record has updated with the challenge value, press Enter for Certbot to perform the verification. If it all checks out, you will receive a message similar to the one below confirming that your certificate has been issued.
Waiting for verification...
Cleaning up challenges

IMPORTANT NOTES:
 - Congratulations! Your certificate and chain have been saved at:
 /usr/local/etc/letsencrypt/live/yourdomain.com/fullchain.pem
 Your key file has been saved at:
 /usr/local/etc/letsencrypt/live/yourdomain.com/privkey.pem
 Your cert will expire on 2018-08-08. To obtain a new or tweaked
 version of this certificate in the future, simply run certbot
 again. To non-interactively renew *all* of your certificates, run
 "certbot renew"
 - If you like Certbot, please consider supporting our work by:

Donating to ISRG / Let's Encrypt: https://letsencrypt.org/donate
Donating to EFF: https://eff.org/donate-le
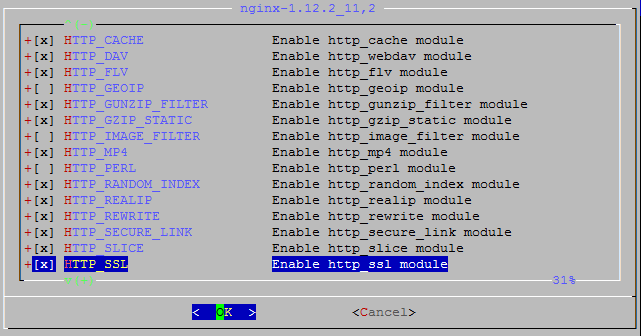
Step 4: Install Nginx with SSL Module
Install Nginx from ports:
$ cd /usr/local/ports/www/nginx && make install clean
On FreeBSD, the HTTP_SSL module is already selected by default.
Step 5: Enable SSL on Nginx
You will need to edit your nginx.conf to configure Nginx to listen to port 443. There is already an example server block for a HTTPS server in the nginx.conf. You can modify that or use the below configuration to have Nginx respond to both HTTP and HTTPS traffic. The bolded items are what you would add to a HTTP server block to enable HTTPS
server {
     listen 192.168.0.1:80;
     listen 192.168.0.1:443 ssl;

     server_name yourdomain.com *.yourdomain.com;

     ssl_certificate /usr/local/etc/letsencrypt/live/yourdomain.com/fullchain.pem;
     ssl_certificate_key /usr/local/etc/letsencrypt/live/yourdomain.com/privkey.pem;

     access_log /home/yourdomain.com/logs/access_log main;
     error_log /home/yourdomain.com/logs/error_log info;

     location / {
           root /home/yourdomain.com/public_html;
           index index.html index.htm index.php;
      }
 }
Now restart Nginx to load the changes
$ /usr/local/etc/rc.d/nginx reload
Step 6: Automatically Renew Your Wildcard SSL Certificates
Remember what I mentioned above about a major caveat about using LetsEncrypt wildcard certificates?
LetsEncrypt certificates expire after 90 days, so the Certbot documentation recommends running the renewal process daily. Certbot can automatically renew your certificates when the expiration date is less than 30 days away with a cronjob. The major issue is if you used the manual method to generate a certificate, your wildcard certificate CANNOT be automatically renewed without some work.
If you do a dry run of a renewal, you will get the following error instead:
$ certbot --dry-run renew --post-hook "/usr/local/etc/rc.d/nginx reload"
-------------------------------------------------------------------------------
Processing /usr/local/etc/letsencrypt/renewal/yourdomain.com.conf
-------------------------------------------------------------------------------
Cert not due for renewal, but simulating renewal for dry run
Could not choose appropriate plugin: The manual plugin is not working; there may be problems with your existing configuration.
The error was: PluginError('An authentication script must be provided with --manual-auth-hook when using the manual plugin non-interactively.',)
Attempting to renew cert (yourdomain.com) from /usr/local/etc/letsencrypt/renewal/yourdomain.com.conf produced an unexpected error: The manual plugin is not working; there may be problems with your existing configuration.
The error was: PluginError('An authentication script must be provided with --manual-auth-hook when using the manual plugin non-interactively.',). Skipping.
All renewal attempts failed. The following certs could not be renewed:
 /usr/local/etc/letsencrypt/live/yourdomain.com/fullchain.pem (failure)
So after every 60 days, you will need to remember to manually renew your wildcard certificate and modify your TXT record with your DNS provider or domain registrar. To automate the process, you either need to run your own nameservers on your server or your DNS provider needs to offer an API to update the TXT records. Then you can write a script that is called by –manual-auth-hook to update the records.
On the other hand, if you used a DNS plugin to create your certificate, then you are all set because the plugin will update your TXT record for you during the renewal process. Let say you use Cloudflare, which also happens to be one of the largest free DNS hosting providers. All you need to do is modify your crontab file at /etc/crontab with the following line:
30 0,12 * * * root /usr/local/bin/certbot renew --dns-cloudflare --post-hook "/usr/local/etc/rc.d/nginx reload"
This will run Certbot renewal process at 30 minutes past midnight and noon, and reload Nginx with the new certificates.
Closing $ense
Hope this post helps with setting up wildcard ssl certificates for your domain. Thanks to LetsEncrypt, you can now easily secure your websites and blogs without needing to spend $80 or more a year for a wildcard certificate from other certificate authorities and resellers.
Missed a step for cloudflare:
2. Create a credentials file for Cloudflare
Next, you need to prepare a credentials file, e.g. credentials.ini, that will allow Certbot access to the Cloudflare API using your private data in the file. Let’s create this credentials file now. Again, in a terminal (as root):
mkdir $HOME/.secret $HOME/.secret/cf
vi $HOME/.secret/cf/credentials.ini
File: credentials.ini
# Cloudflare API credentials used by Certbot
#
dns_cloudflare_email = cloudflare@example.com
dns_cloudflare_api_key = 0123456789abcdef0123456789abcdef01234567
Line no. 3: You can get your email address here: https://www.cloudflare.com/a/account/my-account
Line no. 4: Your Cloudflare API key here: https://dash.cloudflare.com/profile/api-tokens (use the Global API Key).
After saving and closing the credentials file, let’s modify the permissions of the file so no one else can access/read it. In the same terminal (as root):
chmod 600 $HOME/.secret/cf/credentials.ini
Thanks!