It was just over a year ago when if you wanted a SSL certificate for your blog or website, you had to pay for it with your hard-earned dollars. I still remember paying each year for a PositiveSSL certificate from Comodo along with all the hassles of installing the new certificates on my server come renewal time.
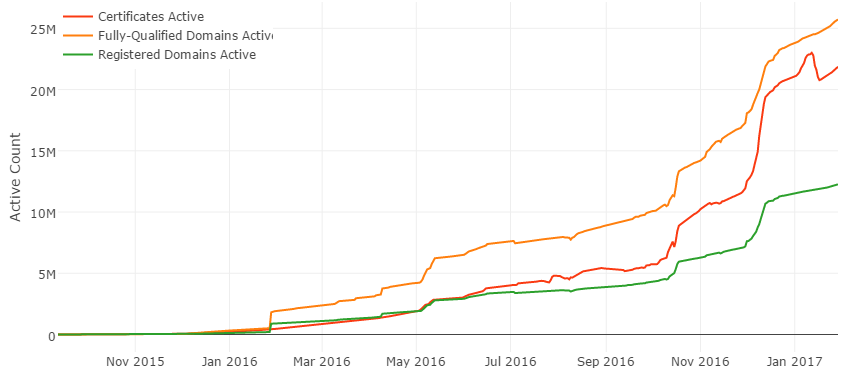
This all changed in December 2015 when Let’s Encrypt started offering free SSL certificates to the public. In less than a year they’ve issued over 20 million free certificates. As of February 2020, they’ve surpassed over 1 billion free SSL certificates.
Never heard of Let’s Encrypt, or are wondering why you should get a certificate for your blog? Read on for more details and a tutorial on how to setup a certificate with Let’s Encrypt in 15 minutes.
Read more: Need a wildcard SSL certificate? Get one for free too with LetsEncrypt
Table of Contents
Why You Need A SSL Certificate For Your Blog
Some of you are probably thinking right now, why should I get a SSL certificate when I am not accepting credit cards, personal data, or other confidential information on my blog? Here are a few reasons why you should consider encrypting the link between your site and the web browser:
Increased security for your WordPress login
Whenever you are entering your username and password to login to your WordPress admin panel, you are sending your login details over the internet. If you do not encrypt this data, there is a chance it could be intercepted by someone along the way.
If you are one of the many bloggers who are writing at coffee shops, internet cafes, airports, and other places using public wifi, anyone who is sniffing the network data could get your login to your blog and cause trouble.
Boost your rankings on Google
Having a SSL certificate will increase your website’s rankings at Google. In 2014, Google published a blog post stating that it will rank sites with SSL higher than those without it to encourage sites to keep surfers’ privacy safe. They will be slowly increasing the importance of security for ranking as more sites start using SSL.
If SEO and getting more traffic is important for your blog or website, you should consider implementing it now that it is free.
Builds trust and confidence with your visitors
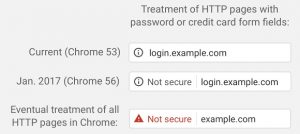
Beginning in January 2017, Chrome 56 will start warning people of non-secure web pages with password or credit card forms. Eventually Chrome will mark all HTTP sites as non-secure in the future with a red warning sign and label. With over 73% of the internet currently using Chrome as their internet browser, expect some worried visitors when they see the warning upon coming onto your website.
Firefox will probably implement something similar in the future since they are one of the major sponsors of Let’s Encrypt.
What Is Let’s Encrypt?
Let’s Encrypt is a completely free, automated certificate authority (CA) that issues SSL certificates without having to manually create, validate, sign, install, and renew the certificates after initial setup. The domain validation certificates from Let’s Encrypt are issued for 90 days at a time and can be renewed automatically indefinitely.
With Let’s Encrypt there is no more having to pay up to $65 a year or dealing with temporary trial certificates from other certificate authorities.
Some of the benefits of using Let’s Encrypt are:
- Completely fee free
- Quick and easy installation
- Works with all major browsers
- No need to wait for validation emails
- No dedicated IP addresses required
- Certificates auto-renewable
How To Install A SSL Certificate For Your Domain
This guide will show you how to install the Let’s Encrypt software on a server running FreeBSD 10, generate a free certificate, and install the certificate on Apache 2.4 webserver. If you are not running your own servers and are using a virtual hosting service, you may need to check with your hosting provider or their knowledgebase to see if they offer Let’s Encrypt certificate creation in their control panel.
You can find a full list of supported and partially supported shared hosting providers that have HTTPS support with Let’s Encrypt.
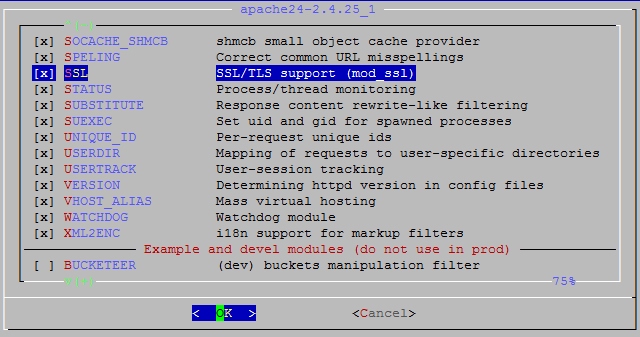
Step 1: Install Apache with the SSL module
Install Apache from ports:
$ cd /usr/ports/www/apache24 && make install clean
Or recompile Apache if already installed:
$ cd /usr/ports/www/apache24 && make config
$ make deinstall install
Make sure SSL/TLS support is enabled:
Step 2: Install Certbot
Certbot is the client that obtains, renews, and revokes Let’s Encrypt certificates
$ cd /usr/ports/security/py-certbot && make install clean
Step 3: Create A SSL Certificate
The Certbot client will need to perform a series of challenges to validate your domain name. Run Certbot, adding -d example.com to the command for each additional domain or subdomain requiring a certificate. By using the —webroot parameter, you will not need to completely stop and restart your webserver when renewing your certificates. Instead Let’s Encrypt will place their challenge files in the path specified after -w and use your currently running webserver to validate the domains.
$ certbot certonly --webroot --agree-tos --email email@yourdomain.com -d yourdomain.com -d www.yourdomain.com -w /webroot/path/yourdomain.com
If successful, a message similar to the one below will appear confirming that your certificates have been approved and created.
IMPORTANT NOTES:
 - Congratulations! Your certificate and chain have been saved at
   /usr/local/etc/letsencrypt/live/yourdomain.com/fullchain.pem.
   Your cert will expire on 2017-05-03. To obtain a new or tweaked
   version of this certificate in the future, simply run certbot
   again. To non-interactively renew *all* of your certificates, run
   "certbot renew"
 - If you lose your account credentials, you can recover through
   e-mails sent to email@yourdomain.com.
 - Your account credentials have been saved in your Certbot
   configuration directory at /usr/local/etc/letsencrypt. You should
   make a secure backup of this folder now. This configuration
   directory will also contain certificates and private keys obtained
   by Certbot so making regular backups of this folder is ideal.
 - If you like Certbot, please consider supporting our work by:

   Donating to ISRG / Let's Encrypt:   https://letsencrypt.org/donate
   Donating to EFF:                    https://eff.org/donate-le
Step 4: Enable SSL In Apache
You will then need to edit your httpd.conf to make sure the SSL module is loaded by Apache. Usually this only requires removing the # from the beginning of the below line
LoadModule ssl_module libexec/apache24/mod_ssl.so
Next you will need to configure Apache to listen for HTTPS connections on port 443 by adding the below line to the Listen section
Listen 443
Now you will need to edit your httpd-vhosts.conf to add a new VirtualHost directive for your secure domain. The best way to do this is to copy the VirtualHost directive for your non-secure domain and modify it with the bolded items
<VirtualHost 192.168.0.1:443>
    ServerAdmin email@yourdomain.com
    DocumentRoot /home/yourdomain.com/public_html
    ServerName www.yourdomain.com
    ServerAlias yourdomain.com
    SSLEngine on
    SSLCertificateFile /usr/local/etc/letsencrypt/live/yourdomain.com/cert.pem
    SSLCertificateKeyFile /usr/local/etc/letsencrypt/live/yourdomain.com/privkey.pem
    SSLCertificateChainFile /usr/local/etc/letsencrypt/live/yourdomain.com/fullchain.pem
</VirtualHost>
Finally, restart Apache to load the changes
$ apachectl graceful
Now visit your site to see if it works:

Step 5: Automatically Renew Your SSL Certificates
Let’s Encrypt certificates expire after 90 days to encourage automation and reduce damage from compromised private keys. Using the renew parameter will check all the certificates on your server and automatically renews them when they are approaching their expiration date.
Certbot’s documentation recommends running the renewal process twice a day. The Certbot client will not renew a certificate until it is less than 30 days till expiration, so there is no harm running it this frequently. Should you run the renew process only once a month, you risk a certificate occasionally expiring before it is renewed.
To renew your certificates automatically is accomplished with cron. Edit your crontab file at /etc/crontab with the following command:
15 0,12 * * * root /usr/local/bin/certbot renew --post-hook "apachectl graceful"
This will run Certbot at 15 minutes past midnight and noon and tell Apache to gracefully restart and load the new certificates when an expiring certificate is renewed.
Step 6: Setup SSL On WordPress
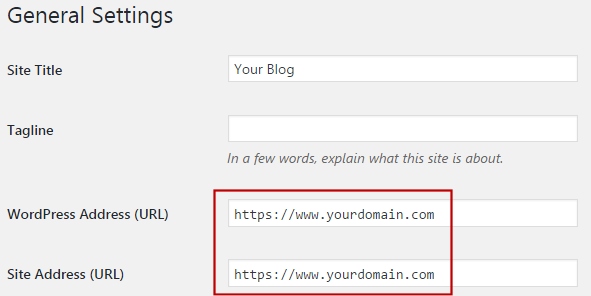
To start using SSL on your blog, go to Settings » General and change the WordPress and Site Address to use HTTPS
If you are doing this for an existing blog, you will need to edit your .htaccess with the below code to redirect HTTP requests to HTTPS
<IfModule mod_rewrite.c>
RewriteEngine On
RewriteCond %{SERVER_PORT} 80
RewriteRule ^(.*)$ https://www.yourdomain.com/$1 [R,L]
</IfModule>
And that’s it. Your blog is now set up and running with all the benefits of being on a secured connection.