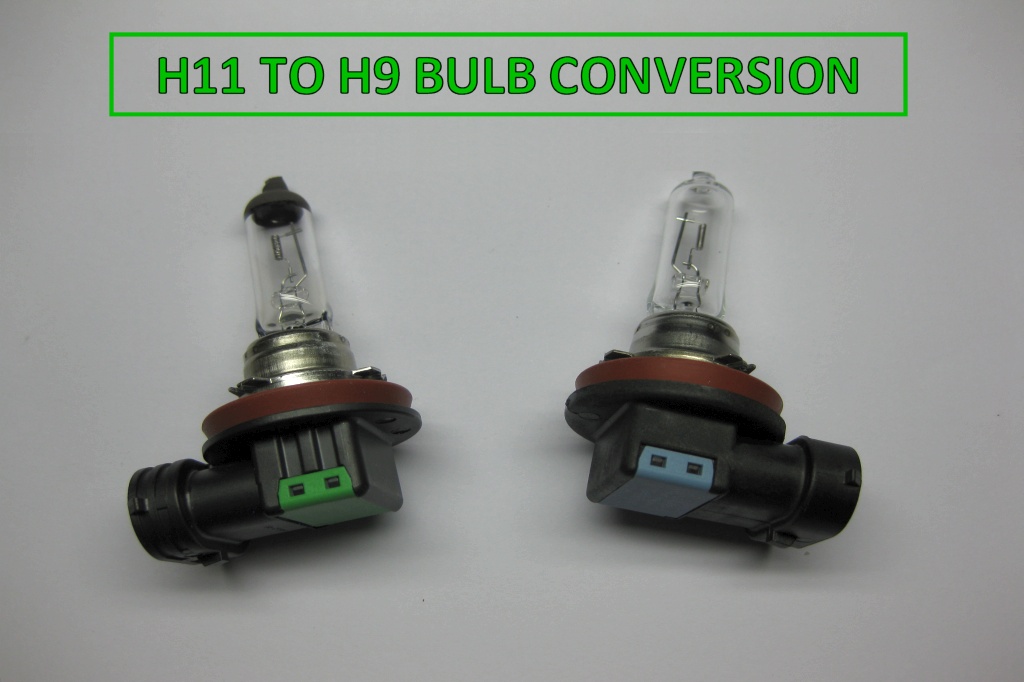
Are you looking to get more light from your car’s headlights without spending a fortune on expensive high-performance halogen bulbs that only last a short time? With this simple H11 to H9 conversion, you can use brighter H9 high-beam bulbs in place of your stock H11 low-beam headlight bulbs.
This H11 to H9 bulb modification takes about 20-30 minutes and requires no changes to your car’s headlights or wiring. The total cost of the project is simply the cost of two new H9 bulbs that can be found in any automotive parts store.
Table of Contents
H11 vs H9 Bulbs
The stock H11 halogen bulbs that come on many cars are 55W and put out 1,250 lumens of light output. The H11 is a long-life bulb that has a rated lifespan of approximately 1,000 hours. Many car manufacturers primarily use this bulb in low-beam applications for its long life.
The H9 is a 65W halogen bulb that puts out 2,100 lumens of light. Due to the higher light output, these bulbs have a shorter lifespan of about 250 hours and are usually used in cars’ high beams.
In comparing the two, the H9 bulb has an 18% increase in power draw for a 68% increase in lumen output, with a quarter of the lifespan.
You will have to decide whether using brighter bulbs at the cost of bulb life expectancy is worth the money. For the average driver, the H9 used as a low beam bulb seems to last for about a year. I believe the increase in safety and the ability to see better while driving at night is worth the money spent.
How to Modify a H9 Bulb to Work in a H11 Headlight
The H9 bulb is not a direct replacement for the H11 bulb. You will need to trim a portion of the metal tab at the top of the outer housing and the plastic tab in the connector housing.
You may do this with a grinding bit on a Dremel tool if you have one available. In my case, I used a simple wire cutter for the metal outside tab and a sharp utility knife for the plastic tab.
When handling halogen bulbs, you should wear a pair of latex or nitrile gloves. Oil from your fingers could cause a hotspot on the glass and cause the bulb to fail prematurely.
Here is how you can convert a H9 bulb to fit the H11 connector on your car.
Items Needed for H9 Bulb Modification
- Two H9 bulbs
- Wire cutters
- Sharp utility knife
Optional
- Dremel
- Alcohol pads
- Dielectric grease
- Nitrile gloves
Step 1 – Trim Top Metal Tab
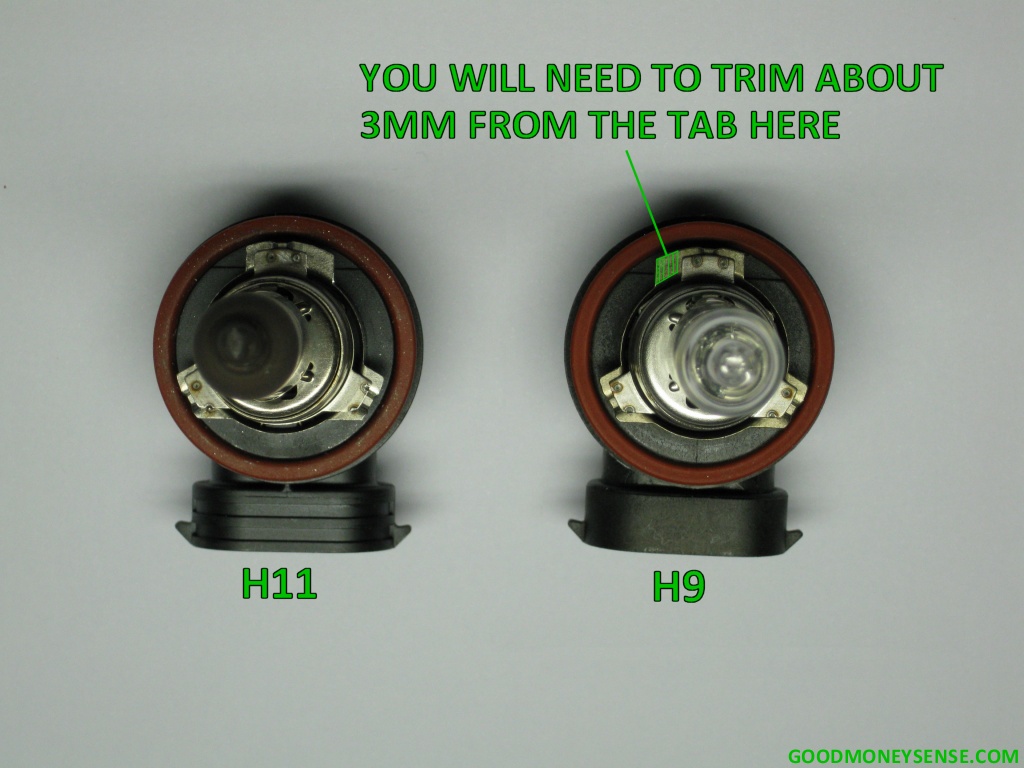
To trim the metal tab, I used the pair of wire cutters to crimp the side and bottom of the section that needed to be removed.
With the bulb facing you, you will need to remove about 3mm on the left side of the top tab.
I didn’t try to cut through the metal tab entirely. Instead, after crimping the metal, I pinched it with the tip of the wire cutter and twisted it to break it off cleanly. This process took about 1 minute.
Step 2 – Remove Inside Plastic Tab
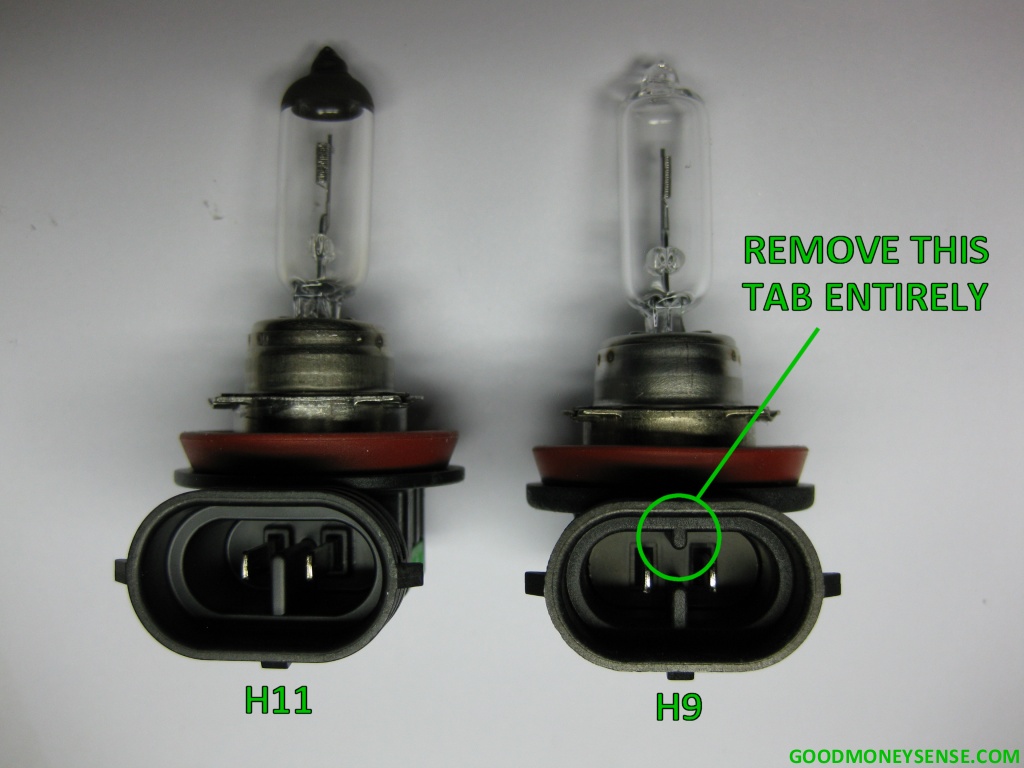
Now, looking at the inside of the socket with the bulb facing up, you need to remove the top plastic tab protruding into the connector socket. I used a utility knife for this step. The process took about 10 minutes.
You will want to take your time and make sure to remove the entire tab completely. That way the connector will seat in the socket fully and there won’t be any electrical arcing.
Step 3 – Cleanup and Preparation
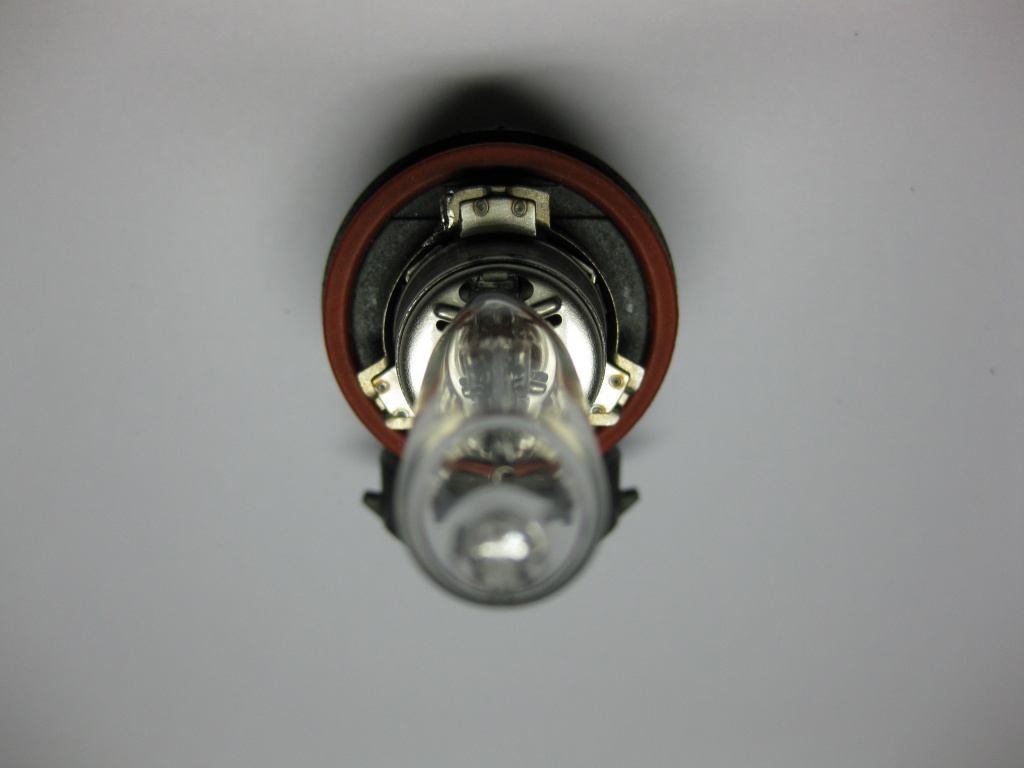
The Modified H9 Outer Tab 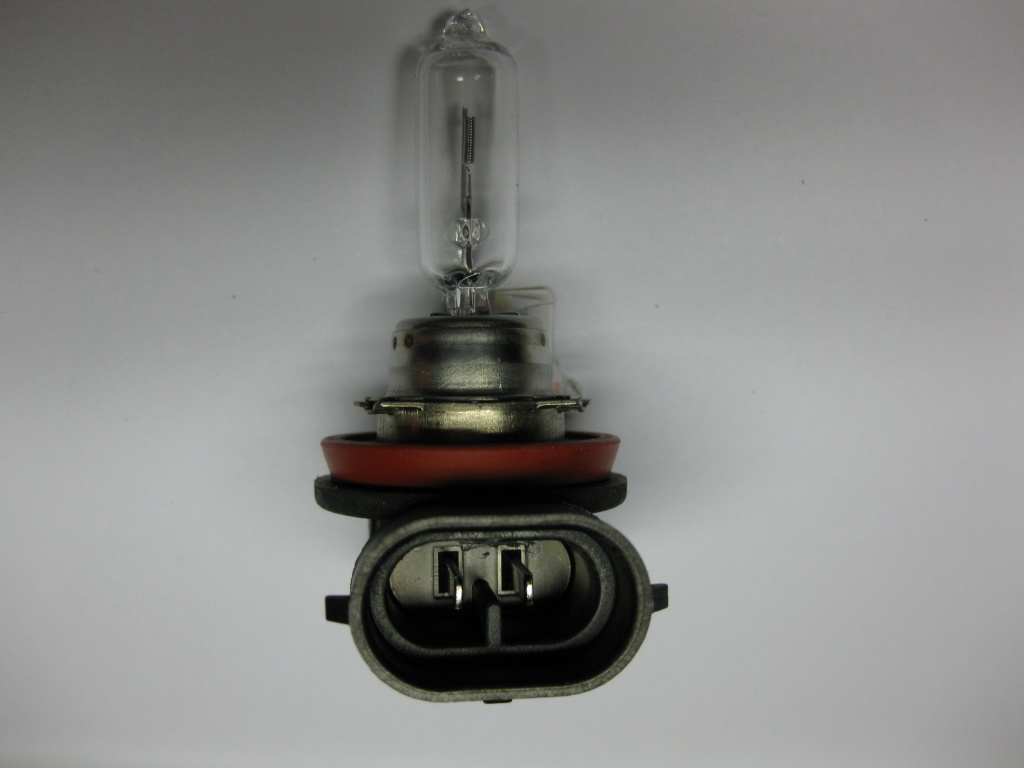
The Modified H9 Socket
Once the tabs have been removed, make sure all the plastic shavings are blown out of the socket.
Consider using an alcohol pad to clean the surface of the glass of any oils and debris that may have come in contact with it.
If available, add a small film of dielectric grease to the connector pins to mitigate electrical arcing across the pins that could result in the connector melting.
Now install your new modified H9 bulbs in your headlamps and enjoy the increased brightness.
Potential H11 to H9 Conversion Problems
Many people have successfully replaced their H11 bulbs with modified H9 bulbs. However, reading on the various online forums, there have been some concerns and potential downsides with doing this modification.
Here are some problems people have reported.
Increased Glare
The H11 bulb has a black glare cap at the tip of the bulb. The H9 does not have this cap. On cars that use reflector housings without a built-in glare shield or cap, you may be blinding oncoming drivers.
Should you have a car with reflector headlights, you may want to use brighter H11 bulbs such as the Philips X-TremeVision or Sylvania XtraVision instead. The Sylvania XtraVision for instance is rated at 1,345 lumens.
Projector headlamps are generally considered safe for doing this conversion. Since you are throwing a lot more light down the road, you may want to make sure your headlights are aimed correctly after performing the H9 low beam conversion.
You should avoid putting LED or HID bulbs on a H11 base in reflector or projector housings. LED and HID may be brighter, but when the filament or light source is not in the correct position that the headlight was designed for, there is a higher likelihood of increased glare.
Melted Wiring and Connectors
Some people have reported the headlight connector melted after converting to H9 bulbs from H11.
I am not sure if this was due to user error from people improperly trimming the connector tab. A poorly trimmed tab inside the socket can result in a partial connection and heat buildup from higher resistance.
My 4Runner came with 65W bulbs for the high beam and I cannot imagine why Toyota would switch to higher gauge or thinner wiring for the low beams only.
Melted Reflectors and Lenses
Going from 55W to 65W does result in additional heat, which could cause the reflector bowl in the headlight or the plastic lenses to slightly melt.
Other Headlight Bulbs That Can Be Modified for More Light
Besides modifying a H9 to fit a H11 connector and headlight, there are also similar modifications that can be done on other types of headlight bulbs. They are:
| OEM Light Bulb | Wattage | Lumens | Alternative Light Bulb | Wattage | Lumens | |
| 9005 (HB3) | 65W | 1,700 | → | 9011 (HIR1) | 65W | 2,300 |
| 9006 (HB4) | 55W | 1,000 | → | 9012 (HIR2) | 55W | 1,870 |
The great thing about going from 9005 to 9011 and 9006 to 9012 bulbs is you are not running over-wattage bulbs. HIR bulbs use a reflective infrared coating to reflect heat back onto the filament so that it becomes hotter and produces more light.
The 4Runner does use a 9005 bulb for the high beam. I decided to skip the 9011 modification since I rarely need to use high beams in my normal driving.
Closing $ense
The H11 to H9 conversion is a low-cost way to get more light from your headlights. The Philips H9 bulbs I purchased are currently selling for about $10 each on Amazon.
Putting more light on the road means safer driving. This is even more important as the days get shorter during the winter months.
The original Philips H11 bulbs in my car were much dimmer and almost useless when driving in the rain at night. Switching to the H9 bulbs resulted in more visibility and being able to see more clearly in the rain without having to resort to turning on the fog lights. The H9 bulbs also produced whiter light than the H11 bulbs.
In addition to doing the H9 mod, be sure to check your headlight lenses. If they are cloudy and yellowed from the sun’s UV rays, you are not getting the full light output from your headlights. Use a headlight restoration kit to clear up the haze and follow up with a UV block clear coat to protect your plastic lenses from yellowing by the sun.
Finally, don’t fall for the marketing hype of whiter light from blue-tinted bulbs that cost $40-$50 a pair. That blue tint may make your lights whiter and look cooler, but the tint is also reducing your overall light output. The important thing about better headlights is being able to see further down the road for any hazards and giving you ample time to avoid them or stop.
Have you done the H11 to H9 low beam bulb conversion? Have you had any issues? Do you recommend any other bulbs for better night vision?
You stated that one should not put hid or led bulbs into a H11/9 headlamp! If you use a good quality led bulbs, this is not an issue because these bulbs are ready and proper for such conversion.. I’ve been using HID and led bulbs without any issues… Jim.
People have had good luck swapping in quality LEDs. The keyword is quality. I’ve seen Youtube review videos where they tested particular brands’ brightness, beam patterns, and glare compared to stock. Some of the better LED bulbs would go for $150+ a set. The issue is when someone goes on Amazon and buys a random H11/9 LED bulb without a clue what they are getting or how it performs other than it fits and it’s lower in cost. Plus, there is also the whole projector vs reflector situation.
If someone is going to do a swap right, they should probably be pointing their headlights at a wall and comparing before/after pictures to see how the light looks so they aren’t throwing light all over the place.
Jim Conlon and Mr. Money,
Both of you are wrong. You should never put HID or LED bulbs no matter the quality in headlamps housing not designed for them.
A lot of glare is produced when using those types of bulbs in a projector or reflective headlamp assembly. These are very dangerous as you could blind oncoming traffic. That is why they do not pass vehicles with wrong bulbs installed in inspections.
Just spreading the word that’s all. Dont be an a$s out there!