One of the best ways to get free traffic quickly to your blog is using Pinterest as a content creator. As a blogger, you have a lot on your plate with only so many hours in a day. Here is how you can automate your marketing with a Pinterest scheduler to free up your time to get more done.
In this post, I’m going to show you how I quickly upload and schedule 30 Pins to two different boards for a total of 60 Pins in 5 minutes with Tailwind. In a few hours, I can queue enough Pins that will be automatically published to my Pinterest account for the next 6 months.
Table of Contents
What Is Tailwind and Why Use It
I have been using Tailwind for over two years. Before Tailwind, I spent a lot of time on Pinterest every day manually uploading Pins and writing descriptions. That was time that could have been spent researching, promoting, and writing more content.
Pinterest has since improved its pinning process by allowing us to upload up to 50 Pins at once and individually scheduling them up to 2 weeks out. Pinterest’s scheduler is okay, but there are better options available.
After a few months of manually pinning, I decided there has to be a more efficient way. As a personal finance blogger, I am a big proponent of finding ways to work smarter, not harder. If spending a bit of money means I can use my time more efficiently, I consider it worth the expense.
There are a couple of ways to reduce your time pinning. You could hire a Pinterest virtual assistant or you can use a Pinterest scheduler. Of those two, the Pinterest scheduler is the more affordable solution.
Among the different Pinterest and social marketing tools currently available, I went with Tailwind because:
- Tailwind is an Approved Pinterest Marketing Partner
- Schedule your posts at the best times for your audience with Smart Schedule
- Bulk upload your Pins with a simple drag and drop
- Analytics to see what is resonating with your audience
- Design attractive pins with Tailwind Create
- Pin to both your boards as well as group boards
- Connect and share content with other bloggers with Tailwind Communities
- Lower your monthly costs by signing up for an annual plan
Try Tailwind for Free, Forever
Not sure whether Tailwind is right for you?
You can now use Tailwind free – forever. With the Tailwind Forever Free plan, you can schedule and publish up to 20 posts per month without paying a penny. You don’t even need to enter any payment details to join.
In addition to the 20 posts per month, free members can use Tailwind Create to design 20 posts per month, join 5 Tailwind Communities with 30 submissions per month, and get access to basic analytics.
How to Bulk Schedule Pins with Tailwind
Here is my tutorial on how I quickly schedule Pins for my Pinterest profile for months at a time.
Design or Create Pins for Pinterest
Before even getting started with Tailwind, you need the images or Pins to post to Pinterest.
I use Canva to create my Pins. Each blog post has its own group which Canva calls a design. Within each group, there are dozens of pages. Each page represents one individual Pin or image.
When I have a new blog post, I make a copy of the last group of images to use as my template. Then I edit the text for each Pin and drag and drop in a new background image. Export the group and I’ll have dozens of new Pins ready to schedule.
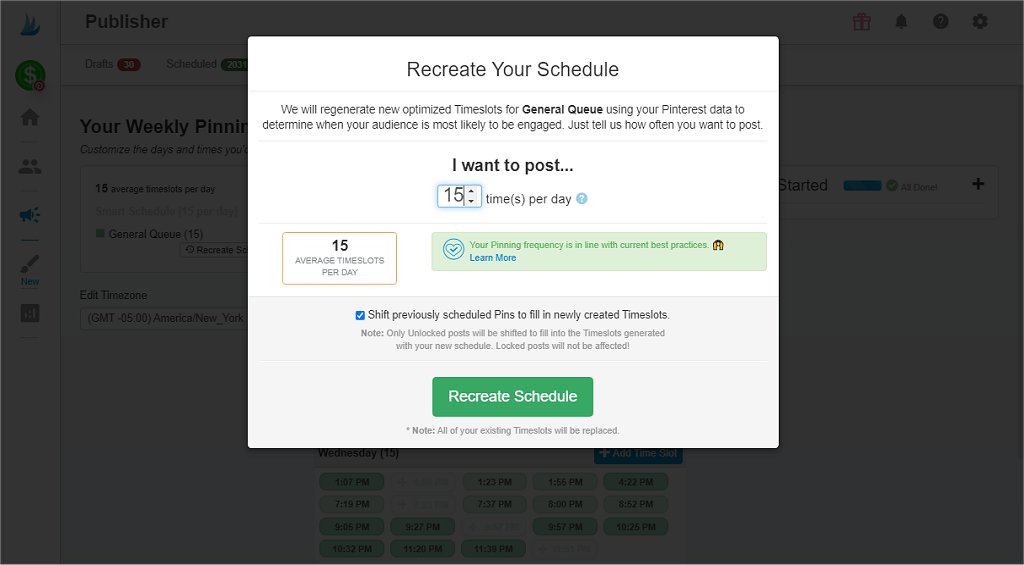
Set Up Your Tailwind Schedule
Now login to Tailwind. Click the Publisher icon on the left menu and navigate to Your Schedule at the top.
Enter the number of times you want Tailwind to post to Pinterest in a day. There is no magic number on the perfect number of Pins per day to get the most traffic. The current best practices recommendation is somewhere between 15 and 25 Pins a day on average.
I settled on 15 Pins a day.
Tailwind’s Smart Schedule will automatically generate a posting schedule with the best time slots using your Pinterest analytics data to determine when your audience is most engaged with your content.
Bulk Upload Your Pins
When you navigate to the Drafts or Scheduled page, you probably noticed the button to Create New Pin by either uploading or using the Tailwind browser extension. I ignore all that.
Instead, I open a separate File Explorer window and select all the Pins I want to upload.
Next, I drag the selected Pins over to the browser window while on the Drafts or Scheduled page. If you did it right, you will see a dark bar appear at the top of the page stating “Drop Files Below to Upload”
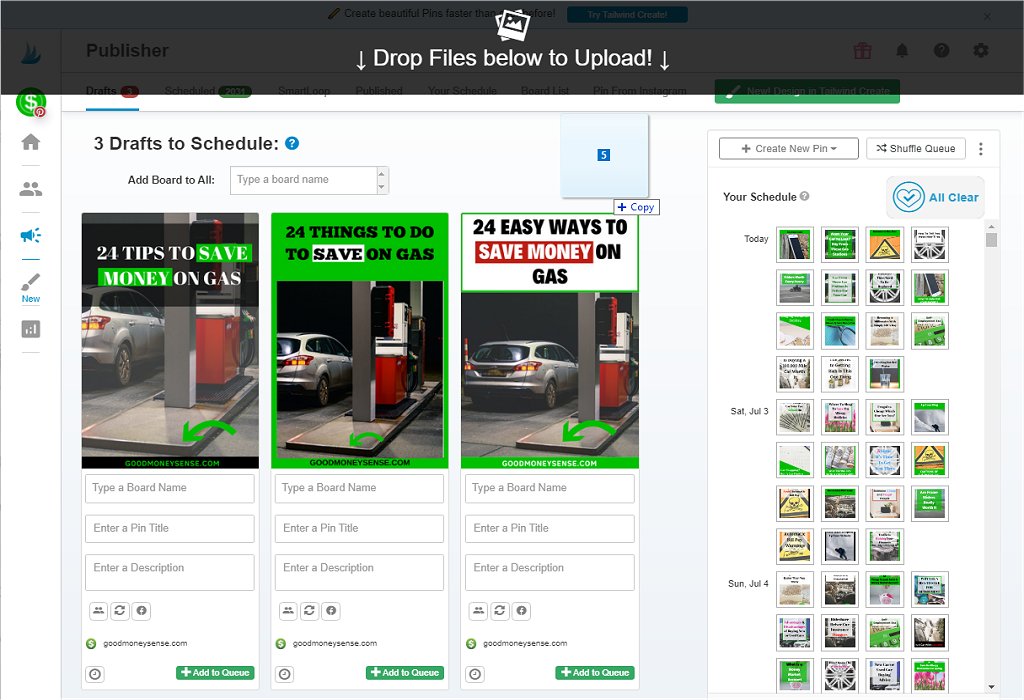
I usually upload Pins in groups of 30 at a time for each blog post. This lets me enter a unique Pin title and description for that group of Pins.
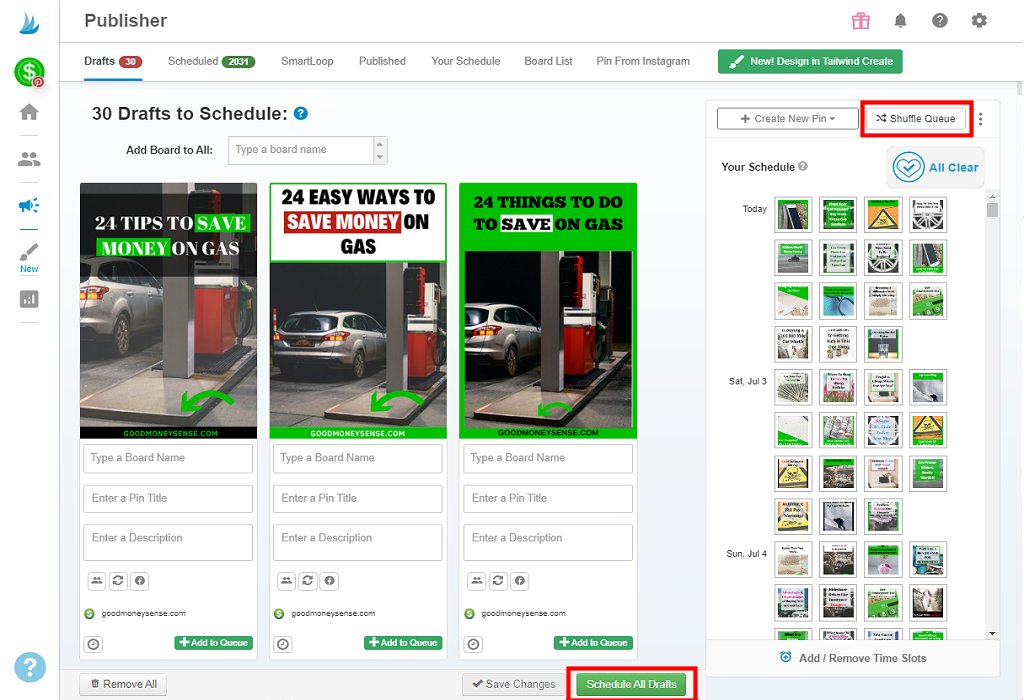
Edit Your Drafts for Scheduling
Once your Pins have finished uploading, they will appear in the Drafts section.
Use the Add Board to All field to automatically assign Pinterest boards to all the Pins on the Drafts page.
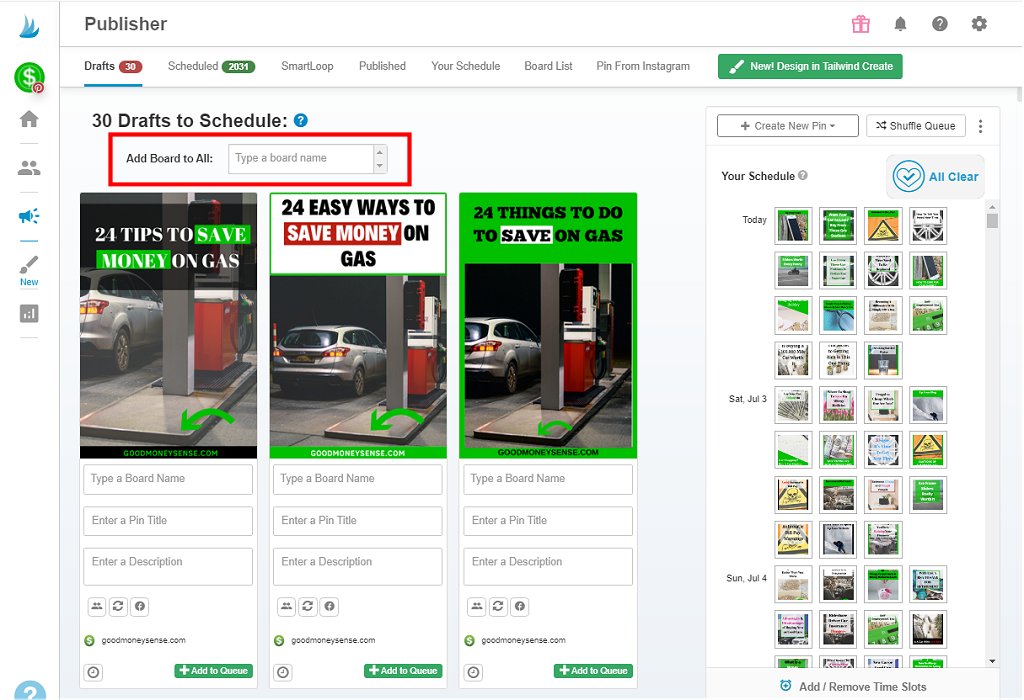
I usually add each Pin to only two boards – My Best of board and a relevant category board.
When you schedule a Pin to more than one board, you will see a button appear on each Pin to set an interval between posts. Ignore this.
Next, you will need to enter a Pin title, description, and the URL for your blog post for all the Pins.
If you enter the URL first, Tailwind will access your page and automatically fill in the Pin title for you. This is a quick way to see if you typed or copied the URL correctly. I prefer to change the title afterward for better Pinterest SEO.
To make copying and pasting all the details to every Pin faster, install the open-source scripting language and program, AutoHotkey, to remap a key to perform multiple functions.
Open Notepad or a text editor and add the below four lines:
`::
Click
Send ^a^v
return
What the above script does is use the rarely used backquote (`) key next to the 1 key as the hotkey. When the backquote is pressed, it will perform a mouse click at the current mouse cursor location, execute a Ctrl-A to select everything within the form field, and replace it with what is on the clipboard as if you had pressed Ctrl-V.
Save the file as Tailwind.ahk and double-click on it to run the script.
Now copy what you want to add to a field to the Windows clipboard using Ctrl-C.
Return to the Drafts on Tailwind and mouseover each field for the Pins and hit the assigned hotkey to paste the contents. Repeat for the title, description, and URL.
Schedule Completed Drafts
To schedule your Pins, click the green Schedule All Drafts button at the bottom of the screen.
Tailwind will place all the newly added Pins in the next available time slots.
To avoid having all the Pins from the same blog post being pinned one after another and looking spammy, click the Shuffle Queue button to randomize the order of Pins on the schedule.
Closing $ense
Using the above method and AutoHotKey, I’ve been able to greatly reduce the amount of time spent manually adding Pins to Pinterest.
Tailwind is not the only Pinterest scheduler available but is one of the most popular. Since Tailwind now has a free plan, it doesn’t cost anything to create a free account to test it out to see if it fits your needs. Use this link and get a credit for a free month if you decide to upgrade to a paid plan.
If you aren’t promoting your blog posts and content on Pinterest, don’t ignore the site as a traffic source. Pinterest now has 478 million active monthly users and is the 14th most popular social network in the world. In 2020 alone, they gained over 100 million additional monthly users.
Do you use Tailwind? What is your preferred method to pin to Pinterest? What other Pinterest schedulers have you tried or do you recommend?